ANATOMY OF A BARE-METAL SYNTH, PART 4
This is the fourth part in a series about a bare metal synth. It assumes knowledge from the last post about pin multiplexing and the Daisy UART driver from the previous post.
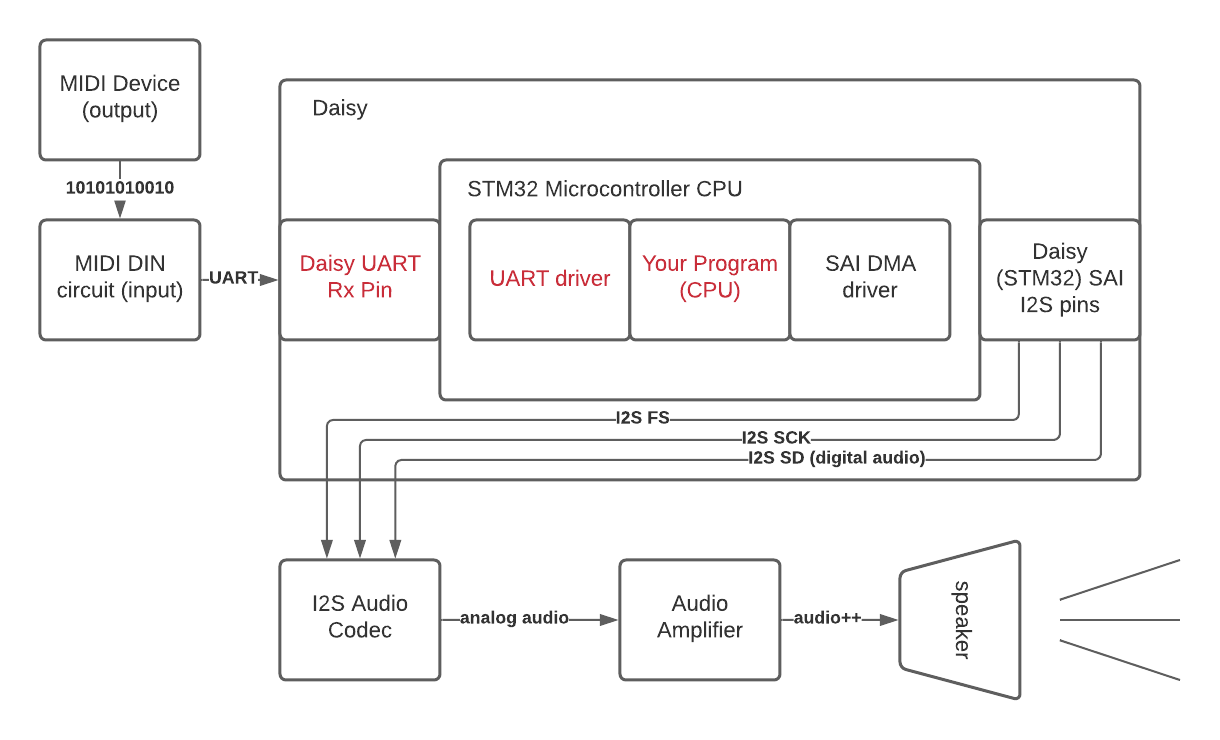
Daisy Synth Code
We’ve now reached the part of the Daisy diagram where we get to do something interesting with the UART MIDI signal described in the last few posts.
We can use the Daisy MIDI library to parse the UART signal as MIDI note-on and note-off messages and generate audio samples to send to the audio hardware based on those messages.
This synth combines a few Daisy examples (specifically PolyOsc and PluckEcho) with some edits to give us polyphony, a nice reverb, and an ADSR envelope / filter on each voice’s oscillator.
The source code for this is pretty small, a couple hundred lines, and lives here.
Here’s what the synth sounds like as well:
Program Components
There are several high level components that make up the program:
DaisySeed seed: The interface that libDaisy exposes to talk to the crucial parts of the hardware on the Daisy Seed. In this program, we use it to talk to Daisy’s audio codec.MidiHandler midi: The interface to the UART hardware on the Daisy that listens for UART messages and translates them to MIDI that we can use in our programVoiceManager<24> voice_handler: A manager of all the voices active in our program. Each voice has an oscillator, and the manager handles passing our MIDI messages to those voices and generating audio that represents all active voicesReverbSc verb: A Sean Costello reverb module from DaisySP that we run thevoice_handleraudio through to mix with reverb
Program Entry Point
We’ll start going over the program by taking a look at it’s entry point, main.
main begins by setting up the seed hardware. The configure and init calls set up the core functionality of the Daisy, such as
SDRAM, QSPI, the audio codec, USB, and some others. UART and MIDI are handled separately (since not all applications use them)
so we separately initialize the MIDI handler, which internally initializes the USART1 peripheral, multiplexes the GPIOs to receive
MIDI, and sets up a DMA interrupt to populate the MIDI handler with incoming messages.
seed.Configure();
seed.Init();
float sample_rate = seed.AudioSampleRate();
midi.Init(MidiHandler::INPUT_MODE_UART1, MidiHandler::OUTPUT_MODE_NONE);
After the initial hardware setup, we initialize the two main effect components of our program: the reverb and the voice handler. The reverb just requires that we pass in some initial params, and the voice handler allocates and initializes all 24 of its internal voices.
verb.Init(sample_rate);
verb.SetFeedback(0.95f);
verb.SetLpFreq(5000.0f);
voice_handler.Init(sample_rate);
Now that our effects and hardware are initialized, we are ready to ask the seed to start sending us audio interrupts and the midi
interface to send us MIDI messages that come in on our GPIO. Note that the seed will call the function we pass in, AudioCallback,
whenever an audio interrupt happens, which happens when the audio hardware needs more samples (more on that later).
// start callback
seed.StartAudio(AudioCallback);
midi.StartReceive();
The last part of our program runs indefinitely until the program is quit. Essentially we ask for any MIDI messages that have come in on the UART driver, and we respond to those messages whenever they arrive. Let’s dive into that MIDI handling.
Notice that AudioCallback is not called explicitly by our code – remember that this is called externally by the audio hardware,
whereas we are the ones explicitly driving the MIDI callback.
while(1)
{
    midi.Listen();
    while(midi.HasEvents())
    {
        HandleMidiMessage(midi.PopEvent());
    }
}
MIDI Handling
Let’s talk about the callback that happens when we receive a MIDI message. All told, this is pretty much the bare minimum MIDI handling for a playable synth. If interested, there is a table of all the MIDI messages here. We only respond to Note On and Note Off messages that come in; everything else is dropped on the floor.
void HandleMidiMessage(MidiEvent m)
{
    switch(m.type)
    {
        case NoteOn:
        {
            NoteOnEvent p = m.AsNoteOn();
            // Note Off can come in as Note On w/ 0 Velocity
            if(p.velocity == 0.f)
            {
                voice_handler.OnNoteOff(p.note, p.velocity);
            }
            else
            {
                voice_handler.OnNoteOn(p.note, p.velocity);
            }
        }
        break;
        case NoteOff:
        {
            NoteOnEvent p = m.AsNoteOn();
            voice_handler.OnNoteOff(p.note, p.velocity);
        }
        break;
        default: break;
    }
}
Really the only thing we do is inform the voice handler that a note on or off happened, which note was affected, and what the velocity was. The voice handler uses this to start or stop notes on different voices.
Voice Handler
The voice handler itself does not generate any audio, it just wrangles available voices. The number of voices available is set at compile time via a
template argument that we pass in. Currently it is set at 24, which means 24 individual notes can be played at once. When the polyphony is reached,
no new notes will sound until an existing note is silenced via note off or the release portion of an existing note finishes. In code, that looks like the following:
void OnNoteOn(float notenumber, float velocity)
{
    Voice *v = FindFreeVoice();
    if(v == NULL)
        return;
    v->OnNoteOn(notenumber, velocity);
}

void OnNoteOff(float notenumber, float velocity)
{
    for(size_t i = 0; i < max_voices; i++)
    {
        Voice *v = &voices[i];
        if(v->IsActive() && v->GetNote() == notenumber)
        {
            v->OnNoteOff();
        }
    }
}
See that when we get a note on, we look to find if any voices are available; if so, tell that voice to start servicing the note. When we get a note off, we go through all the voices and trigger note off behavior for every voice servicing the current note.
The last interesting part of the handler is the Process method:
float Process()
{
    float sum;
    sum = 0.f;
    for(size_t i = 0; i < max_voices; i++)
    {
        sum += voices[i].Process();
    }
    return sum;
}
Again, no direct dealing with oscillators/filters etc – this is the function exposed to the audio callback as we’ll see later, and it just sums up the audio according to each individual voice.
Voices
The next part to dig into is how each individual voice functions.
Each voice is made up of three DSP objects made available by the DaisySP signal processing library, described in the following comments:
-
Oscillator osc_: The oscillator generates the actual tone of the voice at the given MIDI note. It can generate many types of signals; we chose the polyblep triangle wave configuration. -
Svf filt_: The state variable filter controls the harmonic contour of the oscillator, producing outputs for several types of filters. We use the low pass output. -
Adsr env_: The envelope controls the amplitude contour of each “note” generated by the oscillator, producing an attack, decay, sustain, release (ADSR) envelope for each note on.
Some more reading here if interested in the implementations of these components:
The only time these components are used directly in our MIDI handling is when a note on comes in –
we set the frequency of the oscillator at this time according to the given note. (Using the mtof convenience function to convert
a MIDI message to a frequency in Hz). The rest of the handling simply sets flags that are used in the process function to drive the other components.
void OnNoteOn(float note, float velocity)
{
    note_     = note;
    velocity_ = velocity;
    osc_.SetFreq(mtof(note_));
    active_   = true;
    env_gate_ = true;
}

void OnNoteOff() { env_gate_ = false; }
The last interesting part to check out here is the process function, where we use those flags we just mentioned.
float Process()
{
    if(active_)
    {
        float sig, amp;
        amp = env_.Process(env_gate_);
        if(!env_.IsRunning())
            active_ = false;
        sig = osc_.Process();
        filt_.Process(sig);
        return filt_.Low() * (velocity_ / 127.f) * amp;
    }
    return 0.f;
}
Not a lot of code! But let’s break down each section a bit. First, we service the envelope:
amp = env_.Process(env_gate_);
if(!env_.IsRunning())
    active_ = false;
If we received a note on for this voice, env_gate_ will be true. As long as this is true, subsequent calls to the
envelope’s Process call will work through the attack, decay, and sustain portions of the envelope. When we receive
a note off and env_gate_ becomes false, the final “release” part of the envelope will be triggered. And if no new note on
comes in, after release finishes, we will set active_ to false as an optimization to simply pass audio samples of 0.0f until we
receive another note on. The envelope’s Process itself gives us a coefficient amp which we will use to modify the amplitude (volume)
of the oscillator for this particular sample.
Next, we service the oscillator:
sig = osc_.Process();sig is the next raw sample in the oscillator’s waveform that we are outputting for the current pitch (MIDI note). The oscillator itself
continually generates audio samples; it doesn’t know that we are using it to create notes using the envelope. (In other words, the envelope and
tone generation are decoupled; the oscillator is always running at full volume and we determine the current actual volume later by multiplying by a handful of coefficients.)
Then we run the oscillator sample through our filter:
filt_.Process(sig);We pass that raw sample of the polyblep tone into the SVF (state variable filter), which runs the signal through its filter coefficients and stores the result of each of its internal filter outputs for use later.
Then we get the actual output sample from all those pieces-parts:
return filt_.Low() * (velocity_ / 127.f) * amp;We take the low pass output sample that we just generated from the oscillator’s current sample run through the filter, and multiply it by two
volume coefficients: one is the velocity_ of the current MIDI note as a value between 0-127 (usually corresponding to how hard the user hit the key) normalized to the 0.0-1.0 range and the amp coefficient that we generated before, which corresponds to where we are in the current envelope.
Now that we have covered the internals of the synth, let’s look at the final piece: the AudioCallback.
Audio Callback
As mentioned before, the AudioCallback is a function with a special signature that we pass to the audio driver. When the audio driver
wants more output samples, it interrupts our program with this call so that we can fill the outBuffer with inNumSamples floats.
See the previous post for a discussion about interrupts.
static void AudioCallback(float **inBuffer, float **outBuffer, size_t inNumSamples)
{
    // Assign Output Buffers
    float *out_left = outBuffer[0];
    float *out_right = outBuffer[1];
    float dry = 0.0f, send = 0.0f, wetl = 0.0f, wetr = 0.0f; // Effects Vars
    for(size_t sample = 0; sample < inNumSamples; sample++)
    {
        // get dry sample from the state of the voices
        dry  = voice_handler.Process() * 0.5f;
        // run an attenuated dry signal through the reverb
        send = dry * 0.45f;
        verb.Process(send, send, &wetl, &wetr);
        // sum the dry oscillator and processed reverb signal
        out_left[sample]  = dry + wetl;
        out_right[sample] = dry + wetr;
    }
}
We can break this one down as well. The callback starts by initializing our variables. The left and right channels are named just for convenience/clarity, rather than accessing the buffer’s first and second elements directly throughout. Then we initialize the sample that we will use for the dry (mono) synth signal, the send to the reverb (whose amplitude we want to attenuate to mix with the dry signal), and the stereo wet samples coming out of the reverb that we will mix with the dry signals.
float *out_left = outBuffer[0];
float *out_right = outBuffer[1];
float dry = 0.0f, send = 0.0f, wetl = 0.0f, wetr = 0.0f; // Effects Vars
Next we will loop to generate all of the requested samples. This is a standard pattern you’ll see in every audio application; in this case, we are processing both left and right channels at once since we know we will always be stereo, but it’s common to also see an inner loop here to dynamically process a requested number of channels.
for(size_t sample = 0; sample < inNumSamples; sample++)In the loop, we first grab the latest input sample from the voice handler. As we discussed before, this is the cumulative sum of all active voices. We cut it in half to avoid clipping, since we will sum this mono dry signal with stereo reverb signals in a moment.
// get dry sample from the state of the voices
dry  = voice_handler.Process() * 0.5f;
The “send” is just the dry signal, attenuated by a little less than half. We pass that signal into the reverb module, which is an algorthmic FDN-based reverb based on a design by Sean Costello. From that we get a left and right stereo reverb frame.
// run an attenuated dry signal through the reverb
send = dry * 0.45f;
verb.Process(send, send, &wetl, &wetr);
Finally, we sum the left and right reverb samples with the dry sample and put it in the output buffer that gets sent to the audio codec.
// sum the dry oscillator and processed reverb signal
out_left[sample]  = dry + wetl;
out_right[sample] = dry + wetr;
Next up
And that’s pretty much it! Next up we will go over where that audio goes after it is generated by our application.