EMBEDDED LINUX AUDIO BOARD BRINGUP
After writing the first article in this mini embedded audio series, I got a fair bit into the “part 2” article that’s going to be about configuring ALSA and device drivers to output I2S audio before I got quite bogged down by the limits of my knowledge on this stuff. (Turns out it’s a deep rabbit hole!)
Yes, I got things “working” on my end by blurting out some I2S bloops from my Beaglebone out a speaker, but most of it was by tinkering around and following docs online that I didn’t fully understand. And while I definitely recommend this learning-by-doing type of exploration, I wanted to get a deeper understanding of “why” my steps worked before I published anything.
So I read a book! (And after reading, I definitely recommend it. Was great glue for my fractured understanding about a lot of this stuff.) And after reading that book, I thought I’d revisit the content of my first article and go through a better way to develop embedded Linux (audio) applications, closer to how things are done in the industry.
And finally, to cast a wider net, I’m going to take a break from the Beaglebone connected over SSH (if you want Beaglebone specific steps, check out that book above!) and instead use the Raspberry Pi 4 over UART using our very own custom Linux system and toolchain made using Buildroot. Let’s start!
Materials
- Raspberry Pi (I used the Raspberry Pi 4 model B, but should work with all of them)
- Raspberry Pi 5v power adapter
- USB to TTL Serial Cable for talking UART
- Host machine. I used a Mac running latest Ubuntu via VirtualBox.
- SD Card (at least 2GB, more is better) and SD Card Reader
- Headphones or 3.5mm connected speaker (or mini HDMI cable)
What will we be building?
Similar to the last article, we will be cross-compiling the little ALSA toy program booper, but this time we will also be building our own cross compile toolchain,
root filesystem, kernel image, and bootloader as well. Last time we used Debian’s multiarch tools and relied on the “out of the box” Debian image provided by Beagleboard.org, but this approach
has several advantages over that:
- Much more flexibility in which OS your host is running
- Easier to reason about what components are needed for your board – it can easily be regenerated fresh
- Easier to specify which versions of components to use (compiler, target libs, kernel version)
Note that this article will just output audio via the headphone jack rather than via I2S pins.
Get and Configure Buildroot
All of the components needed to create a custom embedded Linux can be created by hand – the cross compiler, root filesystem, bootloader, and Linux kernel. In fact, creating all of these by hand is a good exercise! But in practice, developers tend to use a build system to generate all these components in an automated, easily reproducible way, and spit out an image that you can easily flash onto your board. Two of the most common tools for this are Buildroot and Yocto. Both are great tools; without going into too much detail, Buildroot is generally less fuss than Yocto to get a Linux system working quickly and easily, while Yocto is more flexible but has a bit more of a learning curve.
We’ll be using Buildroot in this article, and you can clone it like so:
git clone git://git.buildroot.net/buildroot
cd buildroot
Tip: If you have issues with building later on, you might want to consider checking out a particular stable release branch and see if that resolves the issue.
Then before anything else, make sure you download all the dependencies as enumerated in the Buildroot docs.
Configure for Raspberry Pi 4 64-bit
Now that you’ve got the Buildroot repo, you can begin configuring it to build images that are compatible with your board.
You could in theory do this all by hand, but luckily most boards (including both the Raspberry Pi and BeagleBone) have “default
configurations”, or defconfigs that can be used as a starting point, upon which you can make further customizations.
To see all the available defconfigs that folks have made in the mainline, run:
make list-defconfigsThe one we will be using is the config for the Raspberry Pi 4 in 64-bit mode, raspberrypi4_64_defconfig.
Will mention more later, but note that these configs are generally the least amount of configuration possible in order to get a working image on your hardware. Every feature/library you want to add (audio, SSH, UART, python) must be done explicitly, described in the next steps.
From here you can activate that default configuration:
make raspberrypi4_64_defconfigA good area to check out when starting a new project is the board-specific readme, found under the board subdir of the
repo. For Raspberry Pi, you can find that at board/raspberrypi4-64/readme.txt.
Buildroot menuconfig
Configuring Buildroot is done with a tool known as Kconfig (invoked using make menuconfig on the command line). This is a
useful interface to get familiar with because many open source tools for Linux systems use this same tool for writing
configuration files, such as the Linux kernel itself, U-Boot, and Crosstool-ng.
In order to open the menuconfig interface, run:
make menuconfigAs a side note, you can customize individual projects that Buildroot builds separately such as the kernel, U-Boot, Barebox, etc. Run
make helpto see which ones you can choose from.
Customize Config to Work With ALSA
The first round of configuration to do is to open menuconfig and make sure that the ALSA utils and libraries that we need
will be included on the target device.
Some basics first: to enable or disable an option in Kconfig, press
yorn, respectively. To open a search box to look for a particular option, hit/.
When you run make menuconfig, you will end up on this screen.
This little walkthrough below is meant to illustrate the workflow for menuconfig/Kconfig. Some options depend on other options and you may find yourself going around a bit to make everything right.
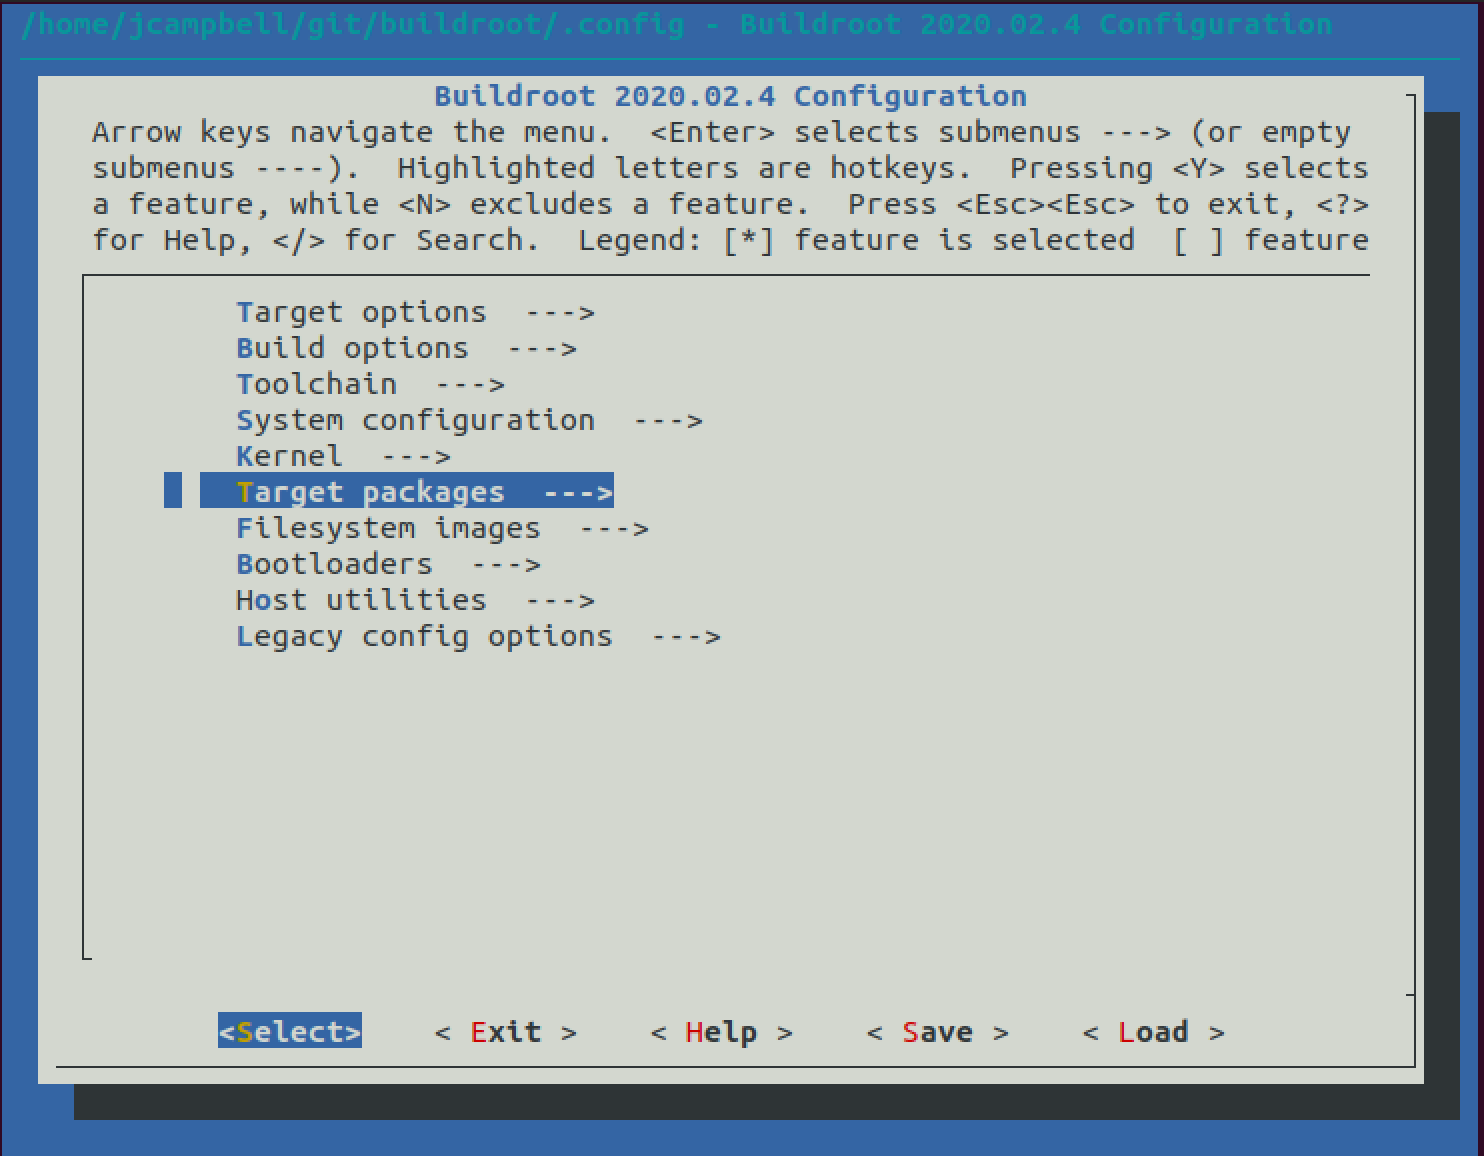
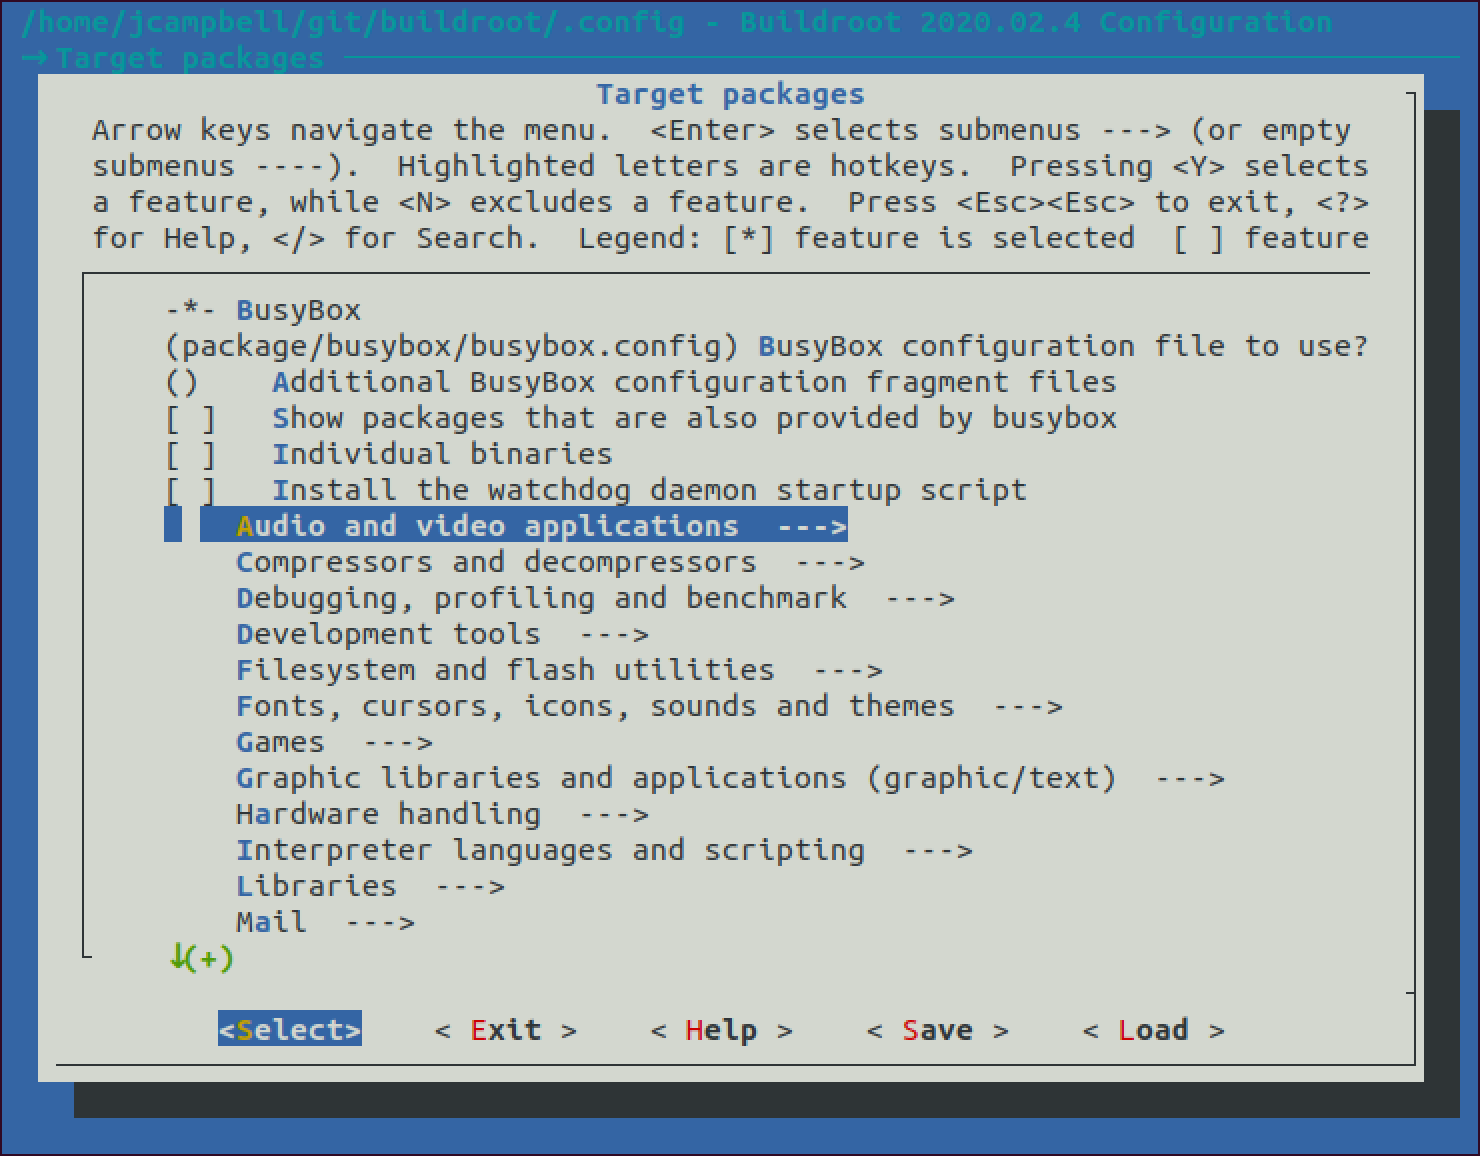
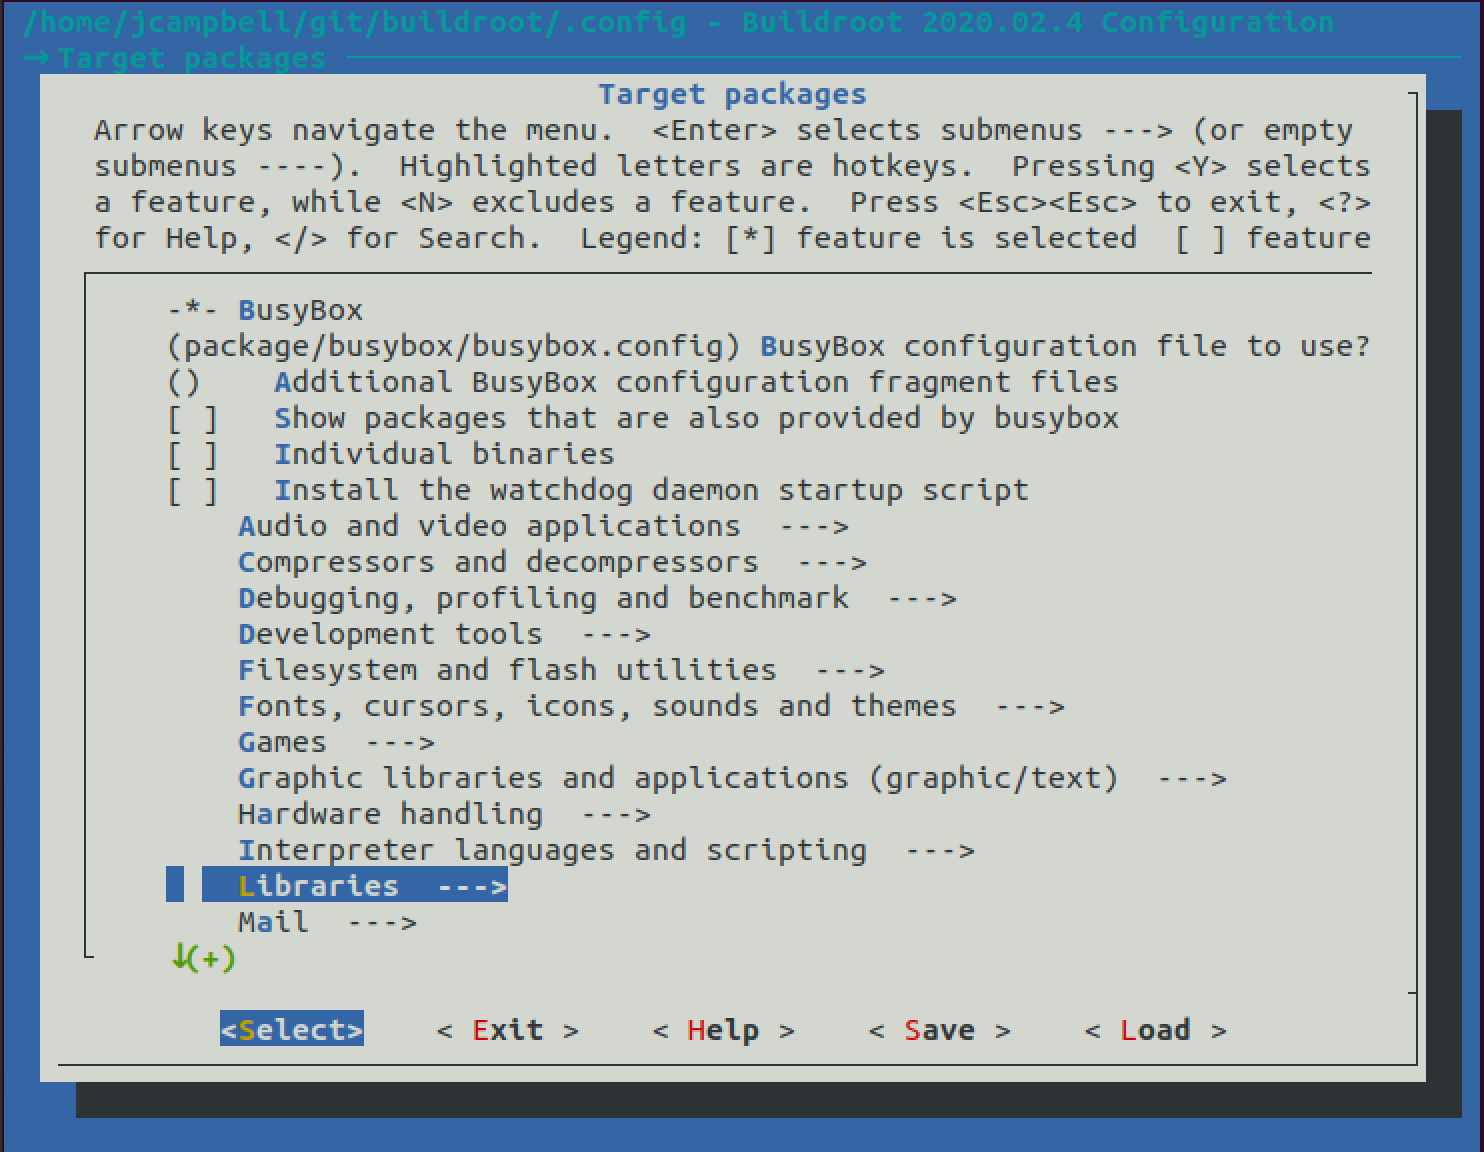
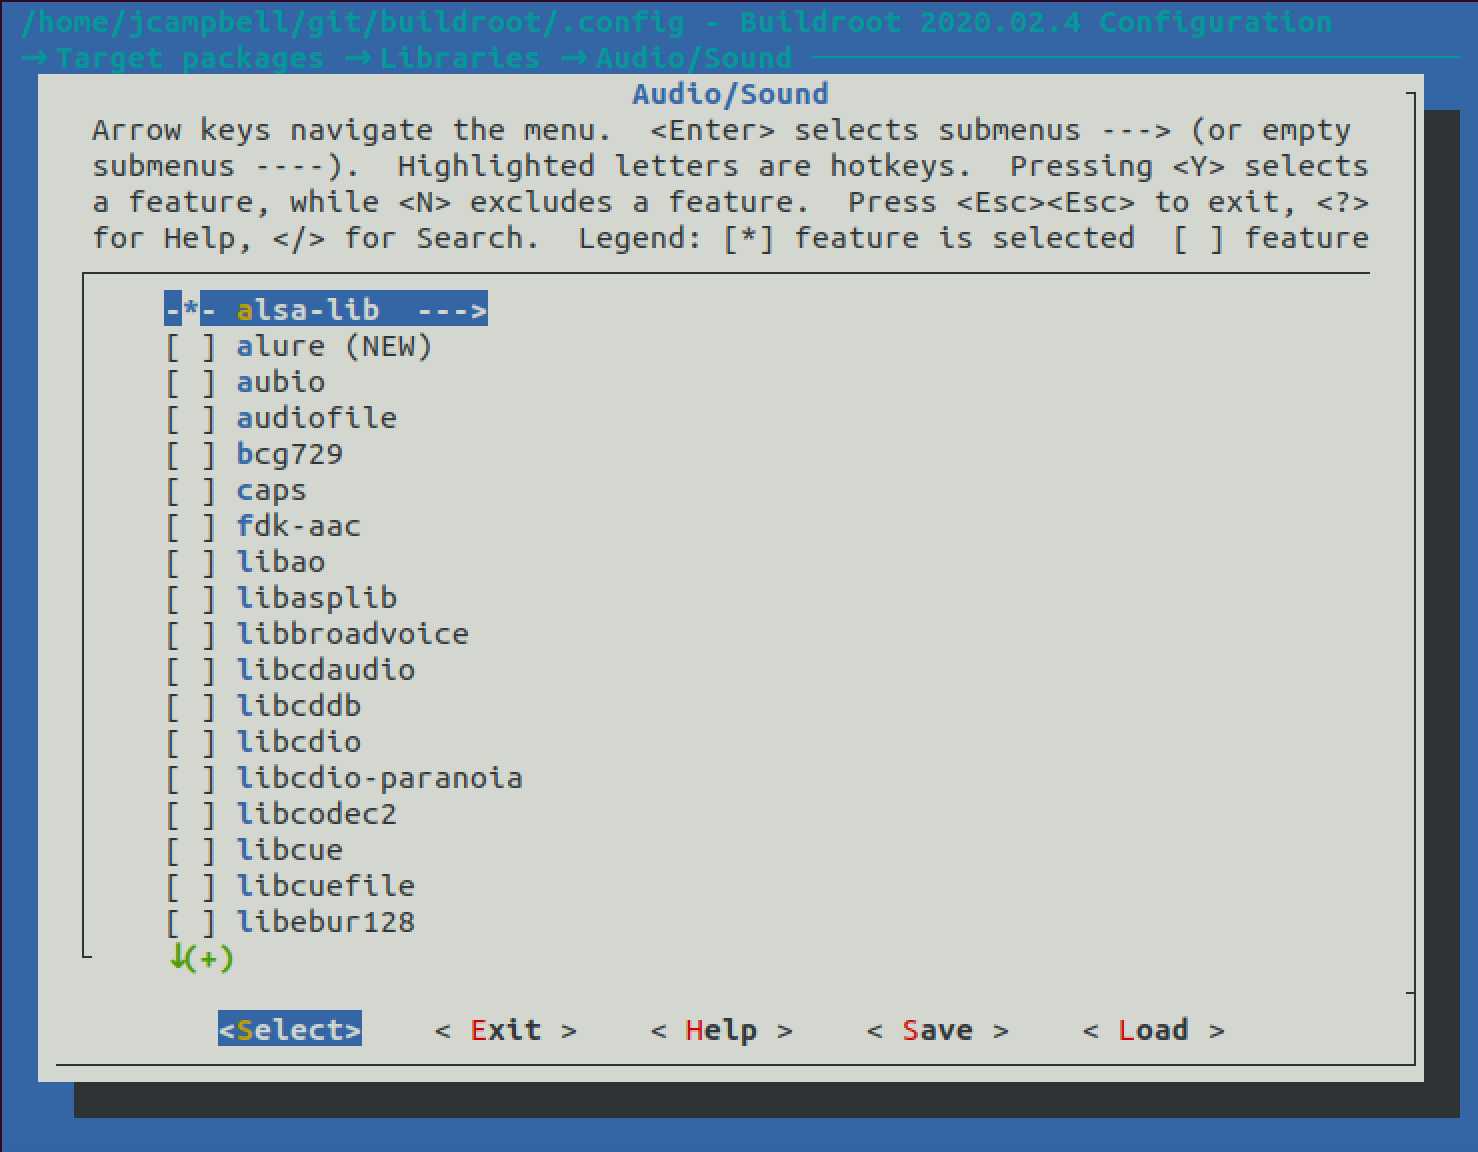
First we will go look at “Target packages”, which is the section where you can decide which applications and libraries (“packages”) that Buildroot will download and build for installation on your target board and in some cases in your cross-compilation toolchain.
After selecting Target Packages, go look under audio applications:
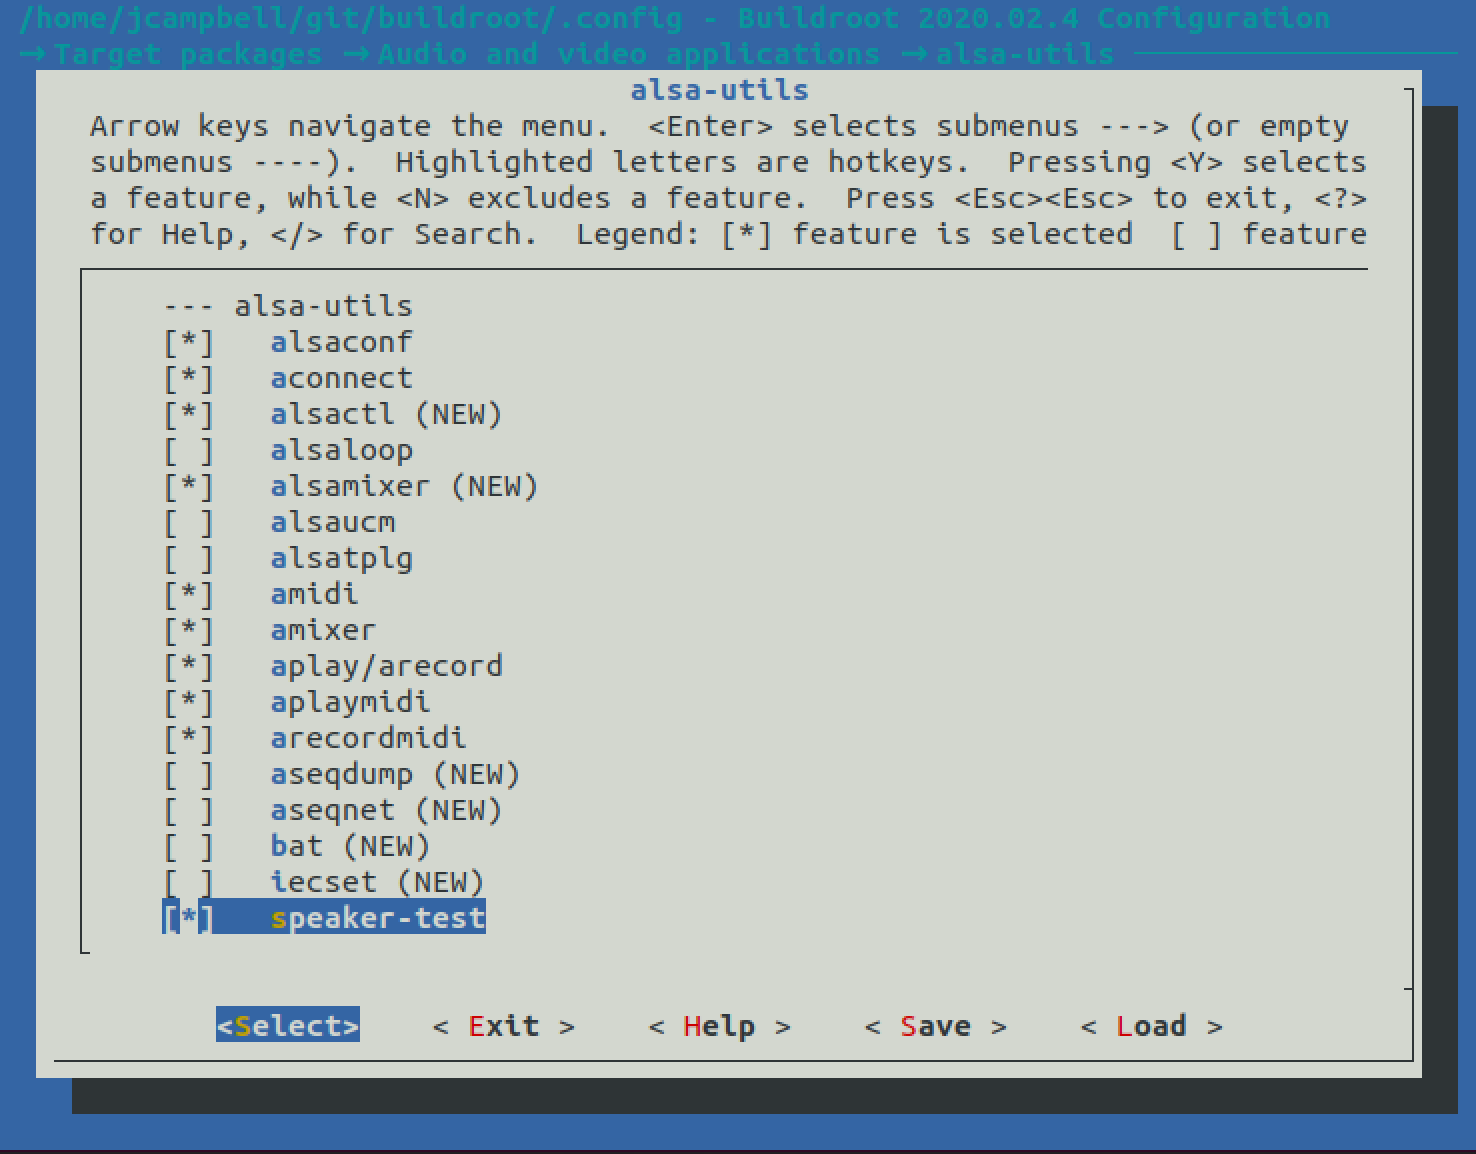
Under here we see alsa-utils is already selected – but if you inspect further, many of the utils are actually unselected by default.
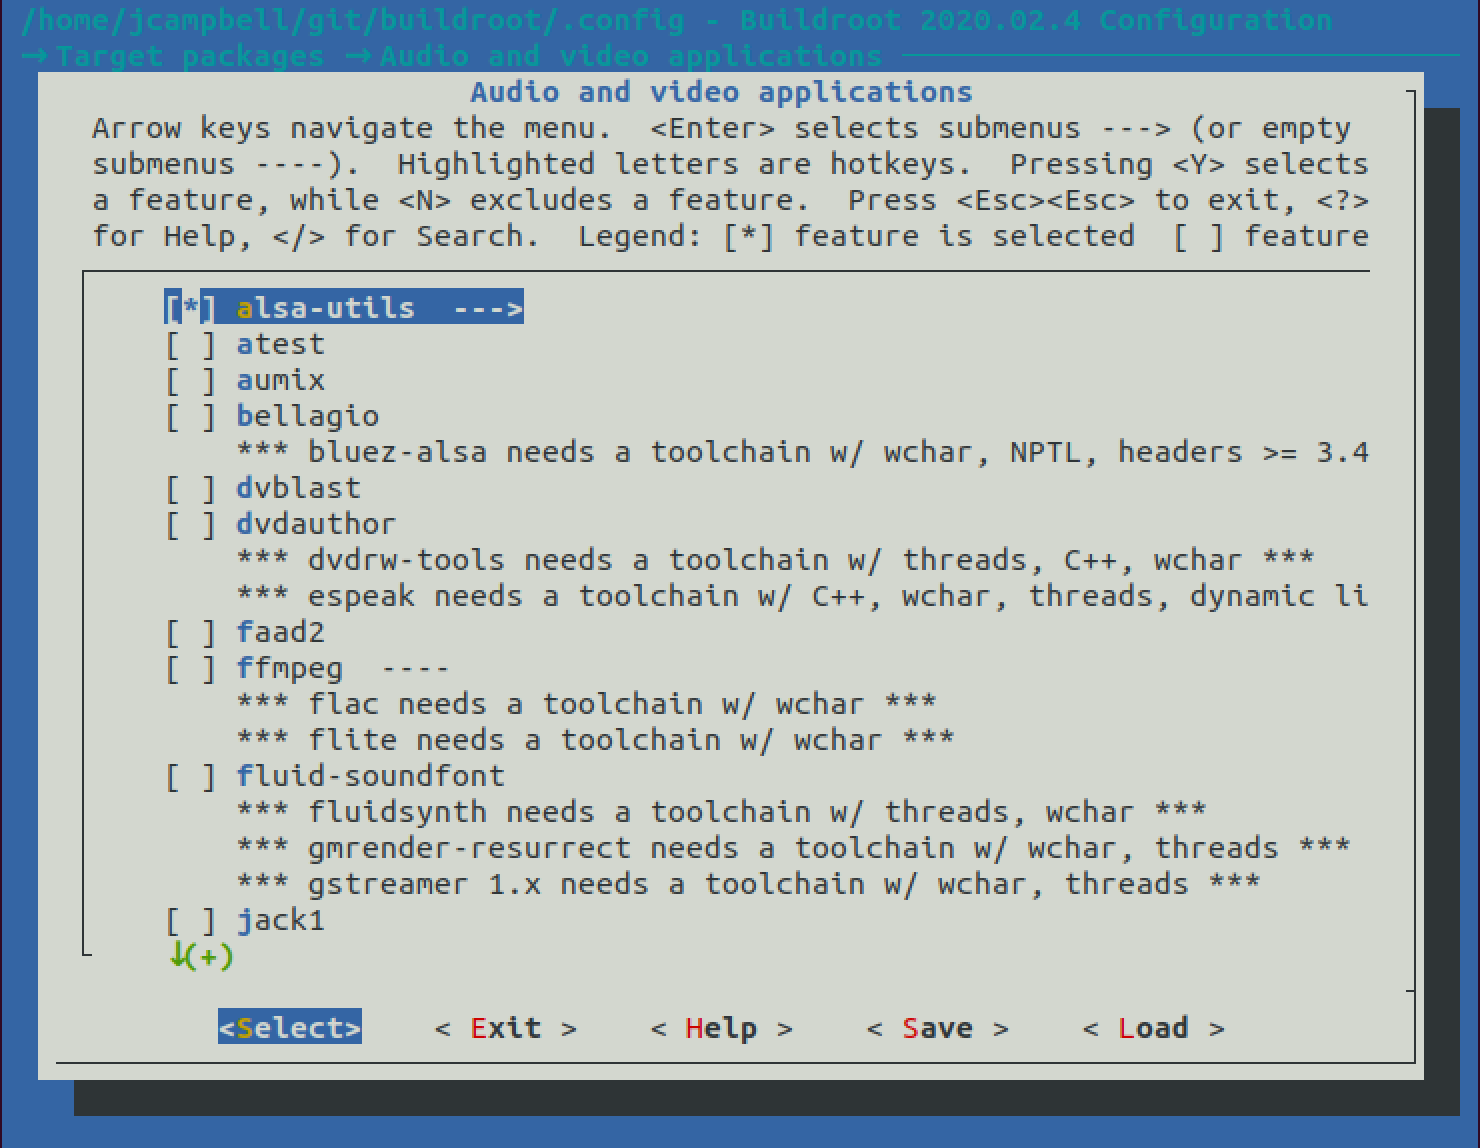
We won’t need all of these, but in development, some of them will be useful (especially aplay and speaker-test).
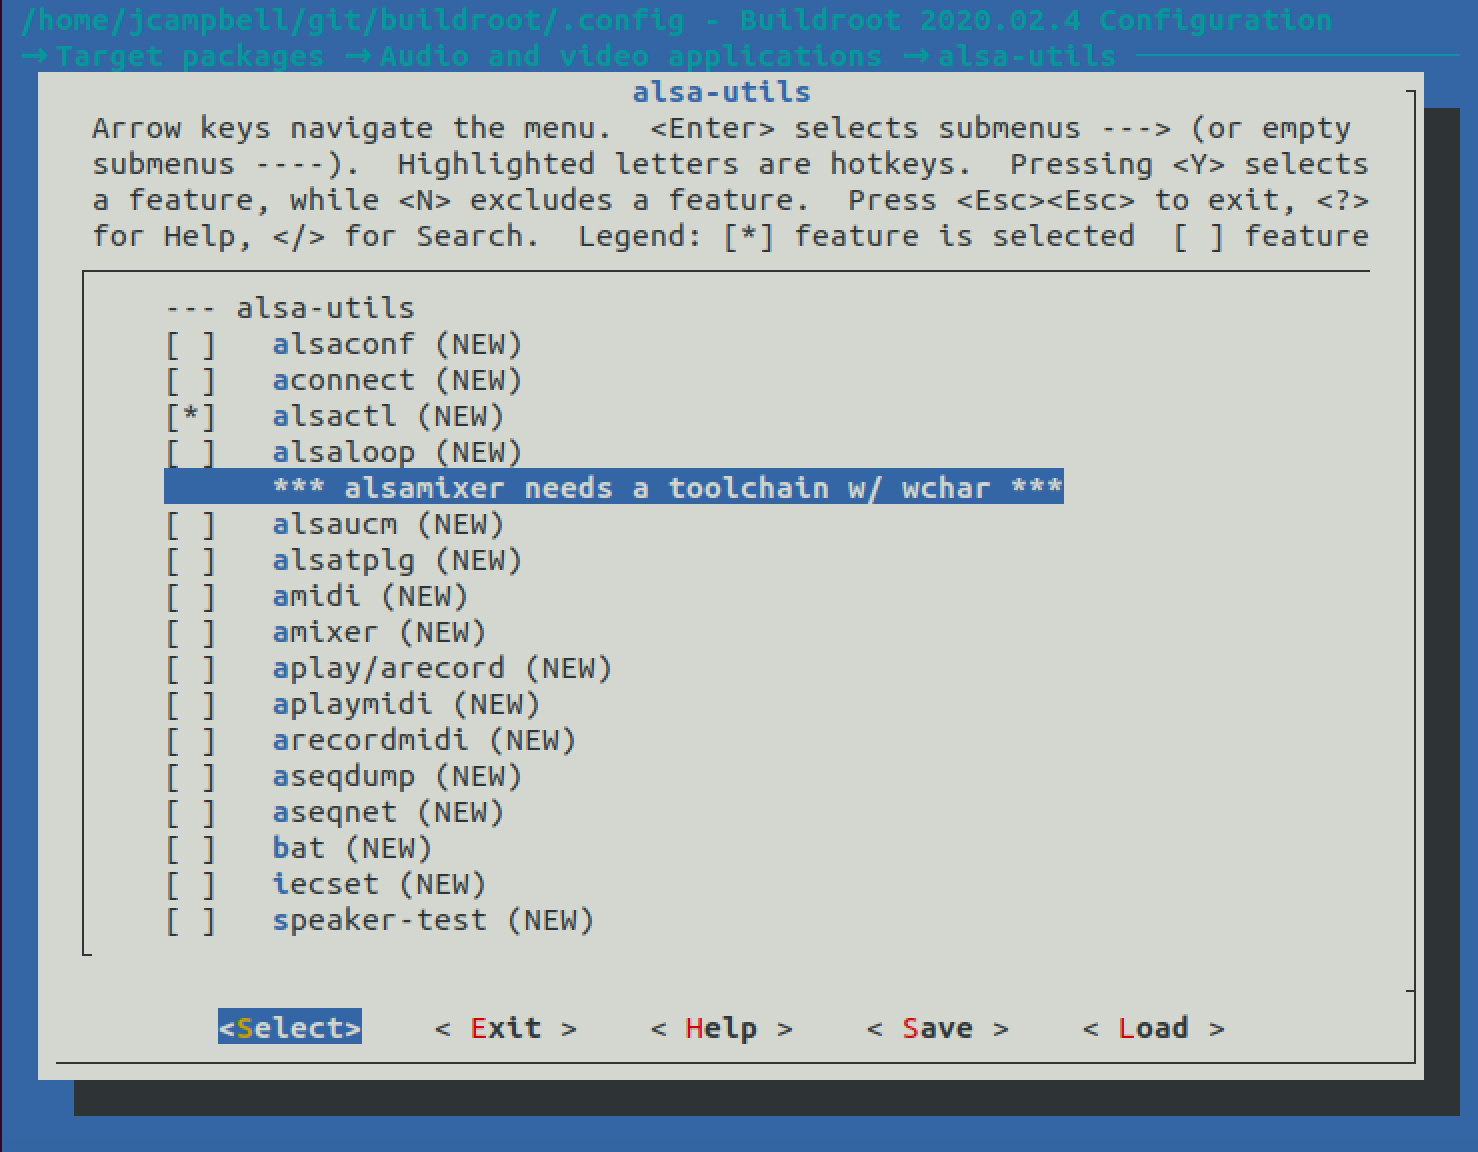
Also, you can see that amixer requires another option to be selected! Let’s assume we want that
application. First, go back to the main screen by hitting selecting Exit
with the left/right keys.
Exitis more like a “back” button, until you get to the main screen; at that point,Exitwill prompt a “Save?” dialog.
So go back to the main screen and see the toolchain options.
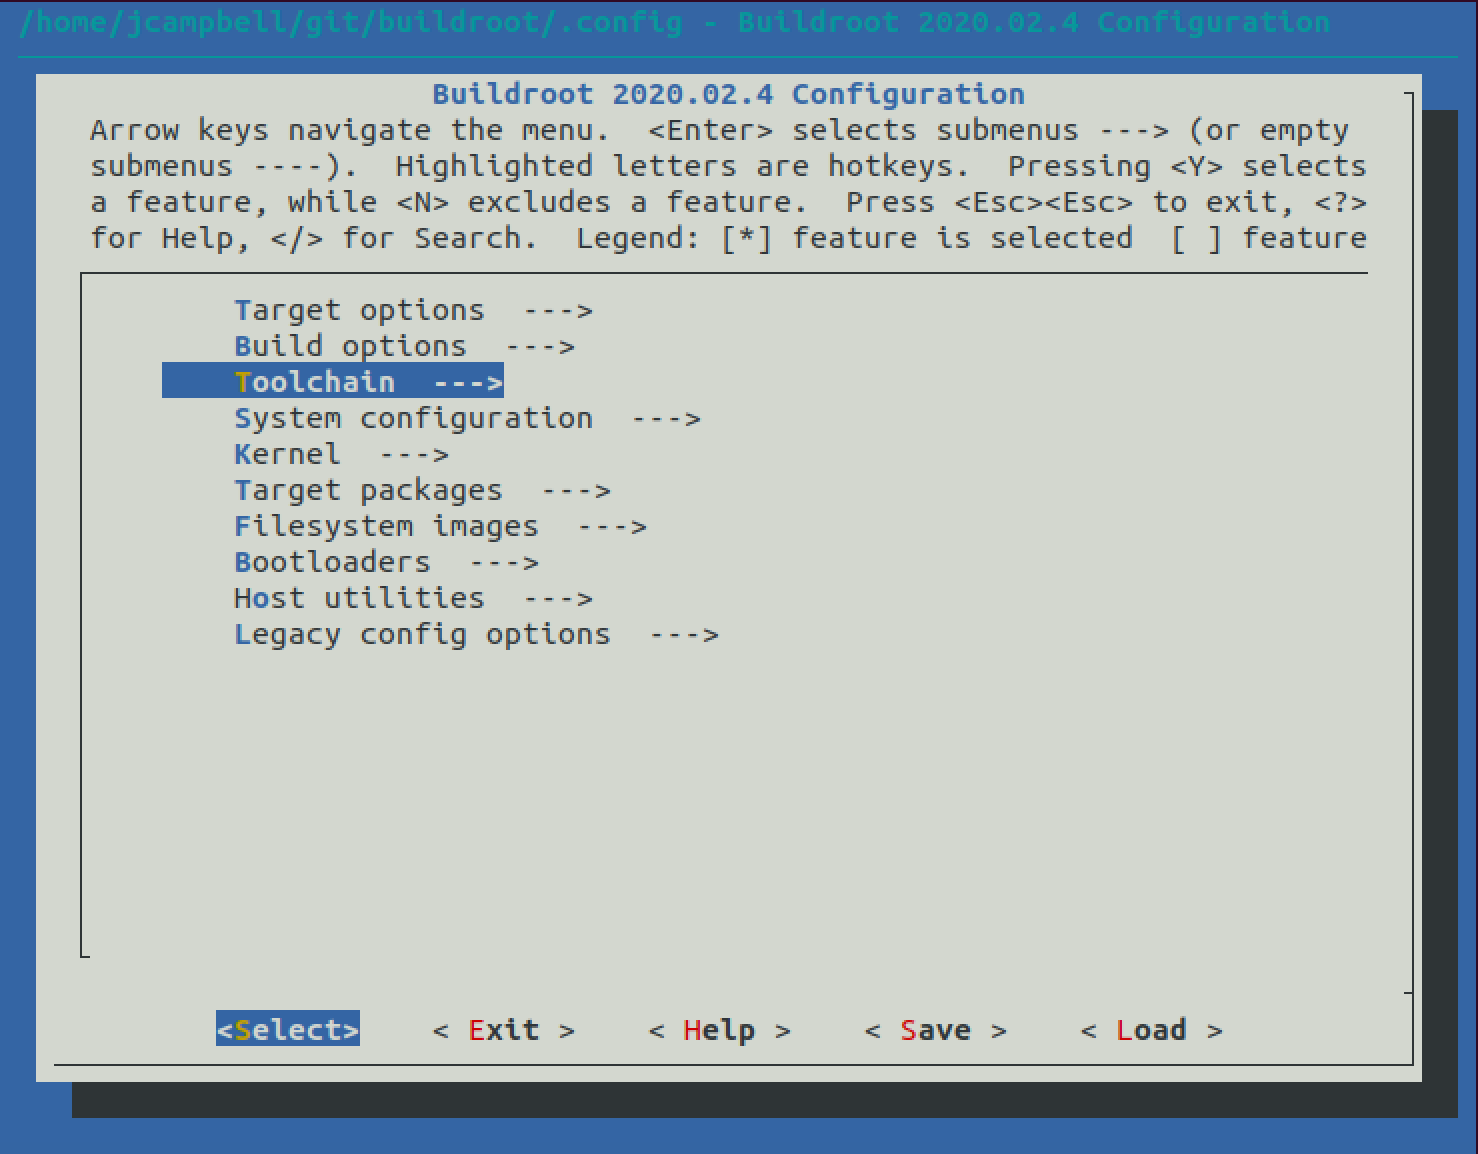
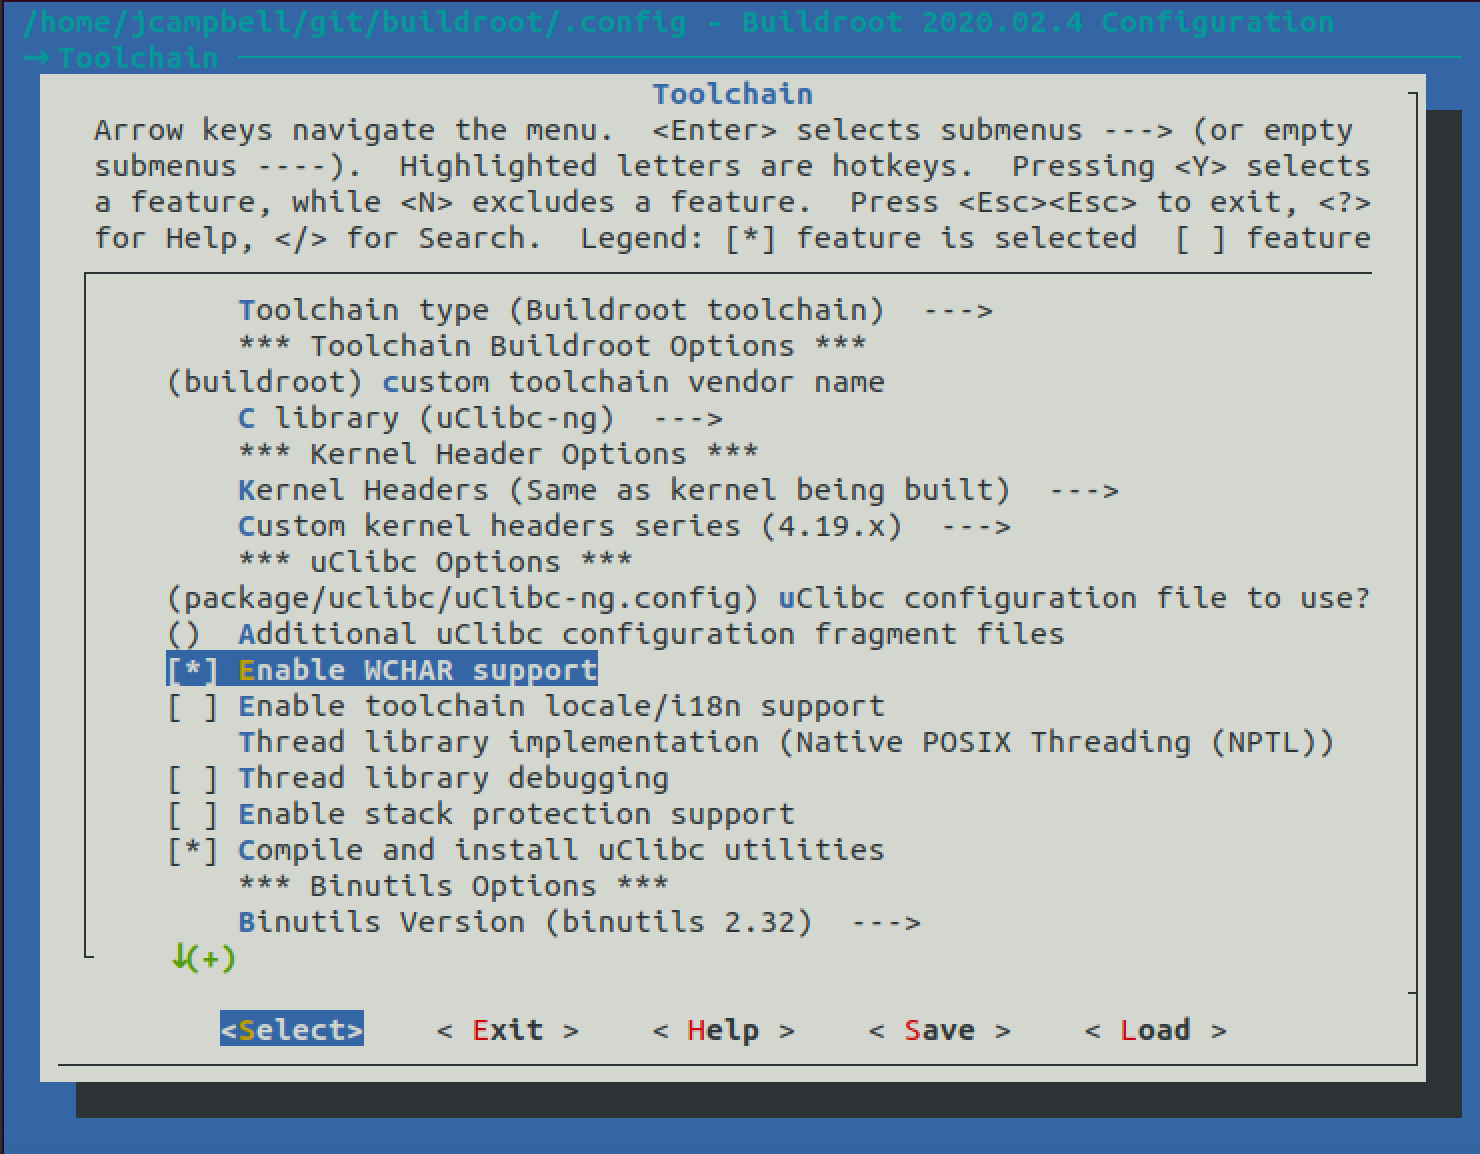
This is where you can enable WCHAR support in the toolchain with y.
Now navigate back to where you were and select whichever utils you want.
From there, exit up one level – we just looked at applications, but “Libraries” shows the packages that our programs will link against/include/etc. These are the libraries that will be both in your toolchain and on the target device.
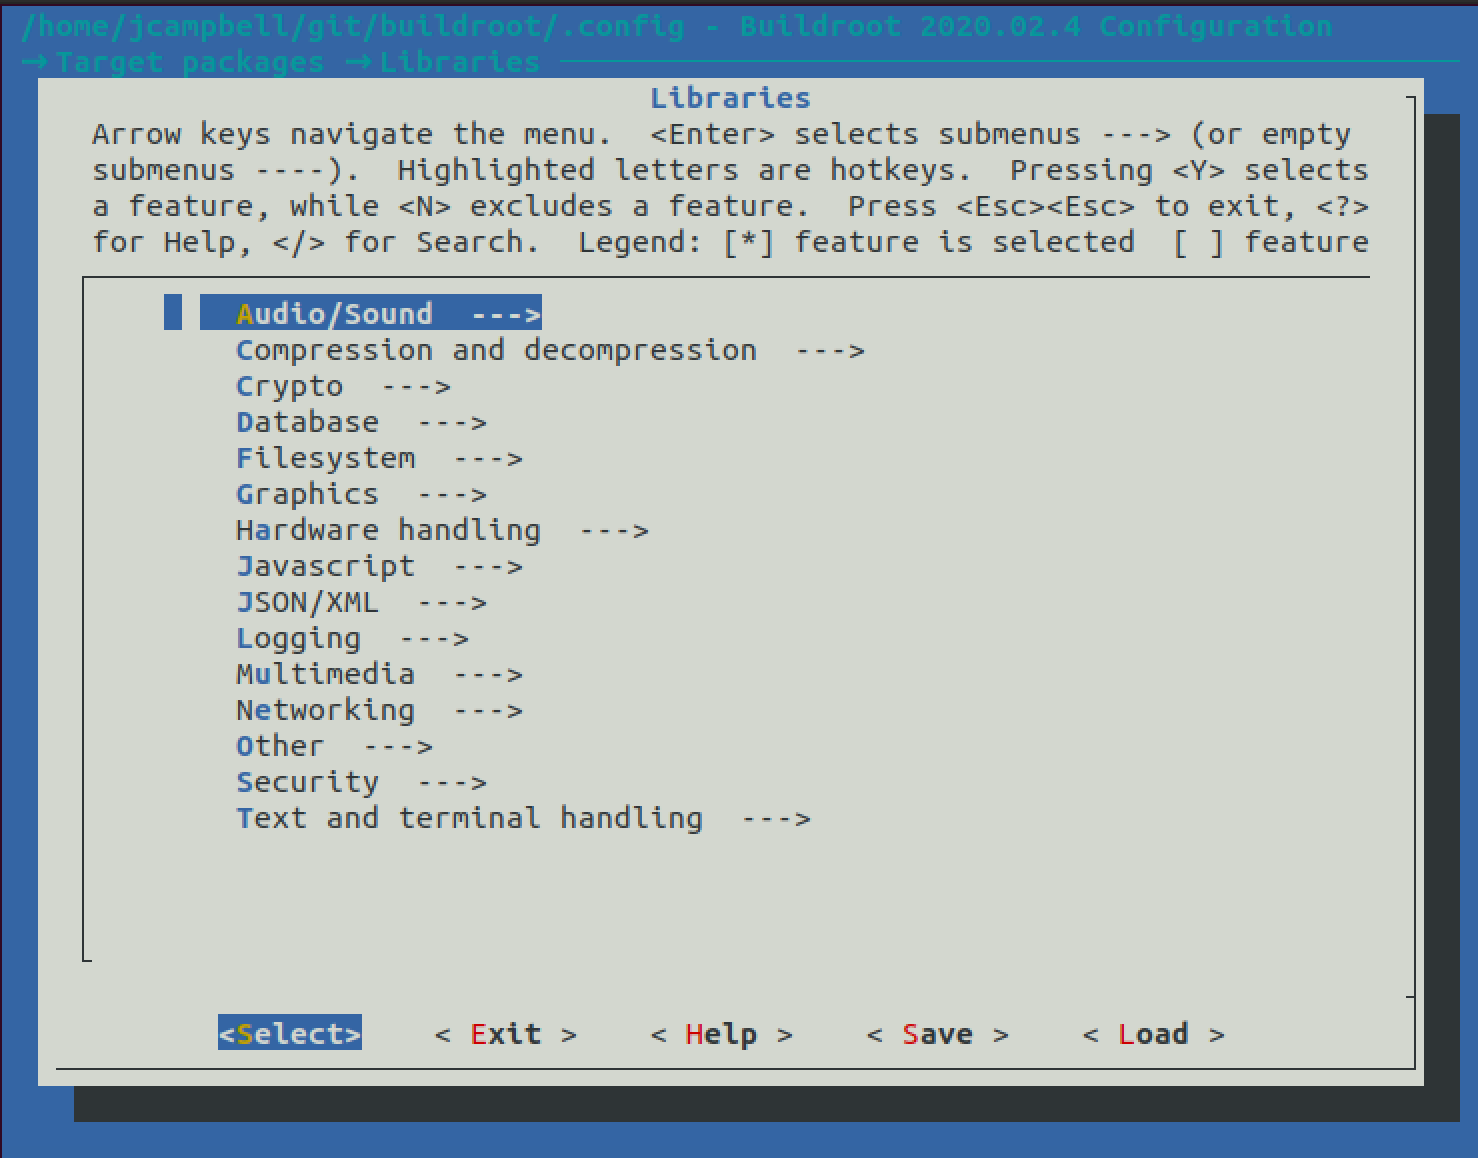
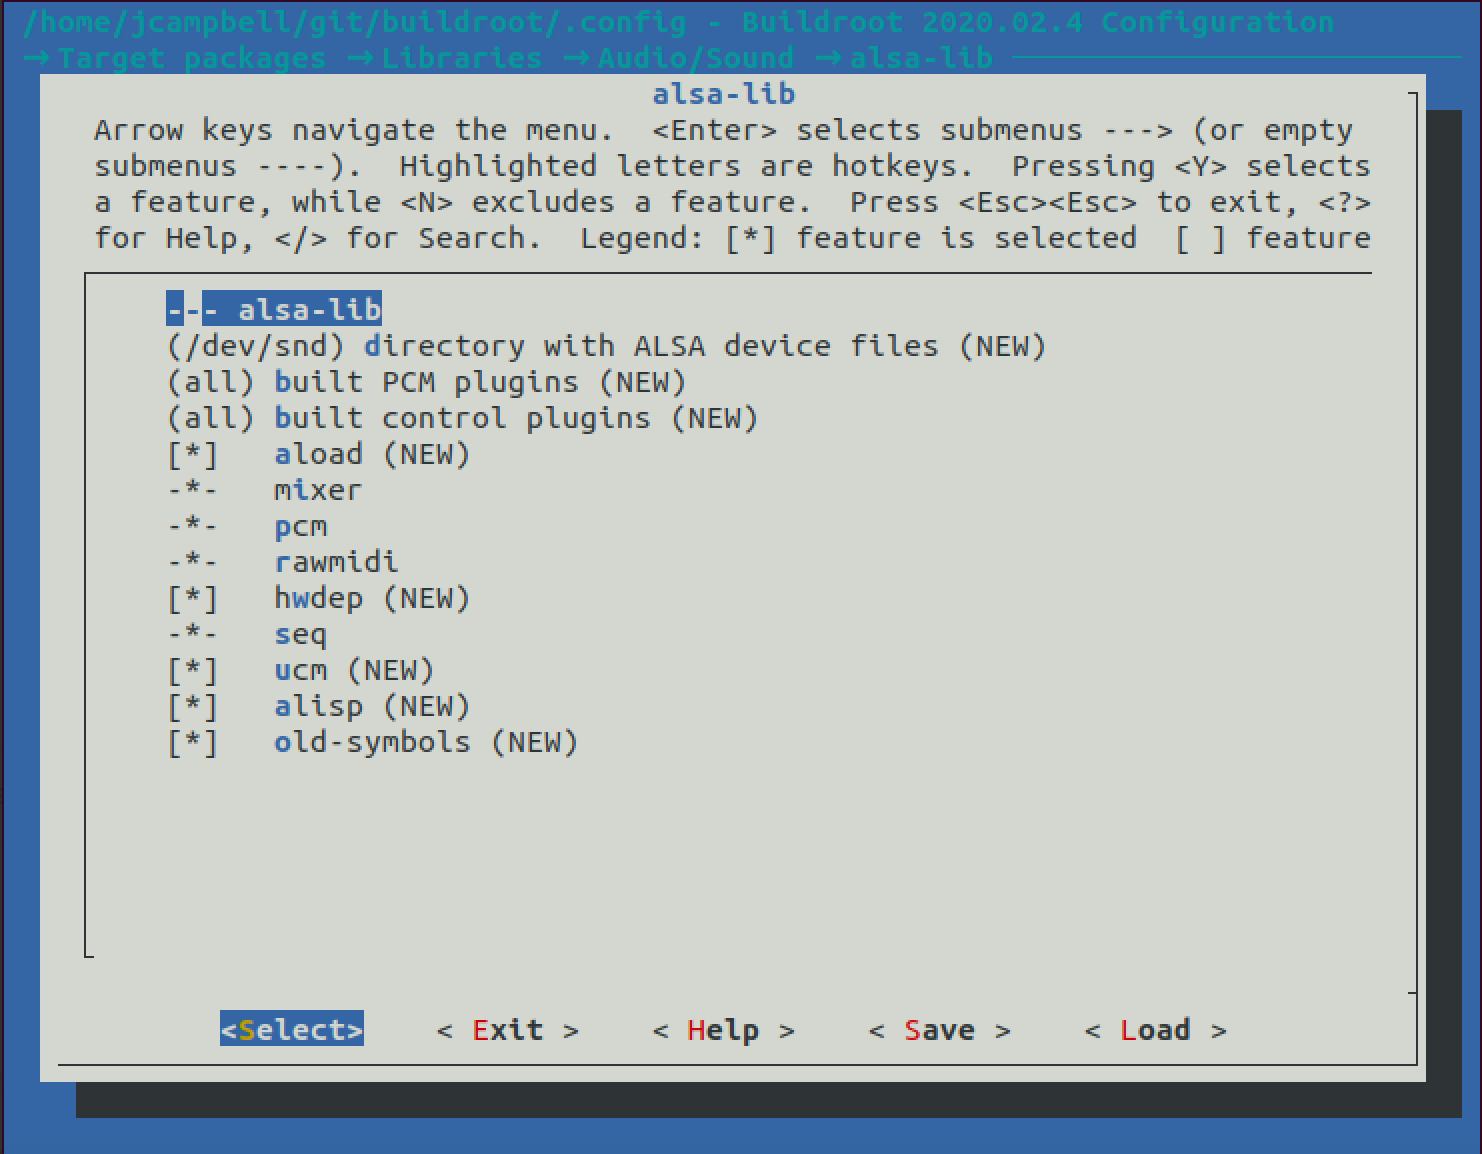
You’ll see that it’s all already enabled! This is because we selected a bunch of ALSA applications that depend on these libraries anyway. If you wanted to forego the ALSA command line applications and only include the libraries that your ALSA app will need, you could just come here straight from the beginning.
When you are ready to save, Exit to the main page and say “yes” to saving. Now your .config file
in the Buildroot directory, which was generated initially by raspberrypi4_64_defconfig, includes
your local customizations. Before we start the build, there is one more series of customizations to make
in order to get audio to work on the Pi.
Before getting into those customizations, there is a question we should answer…
How does an embedded Linux system start up?
There are other, better resources that explain in general how embedded systems bootstrap themselves. For our purposes, it may
suffice that a special program known as a “bootloader” is compiled for the board and executed, which loads the Linux kernel and device tree. The kernel then initializes itself, mounts our root filesystem, and runs an init program.
This init program is the hook where you can add initialization scripts, such as which kernel modules to load and which background daemons to run (either standard ones or applications that you have written). Buildroot offers several different init programs, such as BusyBox, SysV, and systemd, which all have different mechanisms for how you add your own custom logic. We will be using the default in Buildroot, which is the Busybox init.
How does Busybox init work?
Busybox init is configured at the top level via a file located at /etc/inittab. This script allows us to fire off background
programs called daemons at various points in the boot process and configure
whether to wait for the program’s completion or fire it off asynchronously and just continue on.
This script also, by convention, calls user-defined boot scripts that we can use to enable the Raspberry Pi audio kernel module,
snd_bcm2835, at boot time so it will show up as an ALSA device. The convention for these scripts are that they live under
/etc/init.d/S[0-100]your_script_name, and they will be fired off in the order of their number field. To configure our Pi sound
kernel module, we will generate a shell script named /etc/init.d/S35audio.
How do we enable a kernel module?
The script itself will simply call modprobe snd_bcm2835. modprobe is a Linux command that tells the kernel to load
externally compiled Kernel Modules. There may be other modules you
want to load, like the USB audio module; you can check out the available audio-related kernel modules by running
modprobe -l snd_* on the board.
Board Specific Build Scripts
With that background in mind, we have to find a way to tell Buildroot how to put these scripts in place for us.
Turns out there is are options in the Buildroot config to specify scripts to be run during the build process, generally called post-build.sh or post-image.sh depending on where in the
build process they are run. These scripts already are set up in the defconfig for the Raspberry Pi, so we just have to edit
the existing board/raspberrypi/post-build.sh and board/raspberrypi/post-image.sh in the Buildroot repo to add
the customizations we want.
Post Build Script
The first script to edit is post-build.sh, which is run after the compilation of the components but before an SD card image is
created. This is the hook we want for generating the init scripts, because we can generate the init scripts to be inserted into
the root filesystem that will be installed on the board.
This is the code we need to add to board/raspberrypi/post-build.sh:
Note: Rather than generating the
initscripts, it’s also a possibility to create a “Rootfs Overlay” that contains them.
cat <<EOT > ${TARGET_DIR}/etc/init.d/S35audio
#!/bin/sh
modprobe snd_bcm2835
EOT
# need to also make this executable
chmod +x ${TARGET_DIR}/etc/init.d/S35audio

cat <<EOT > ${TARGET_DIR}/etc/asound.conf
pcm.!default {
	type hw
	card 0
	device 0
}

ctl.!default {
	type hw
	card 0
	device 0
}
EOT
This creates both the executable S35audio init script that adds the kernel module for the audio peripheral of the Broadcom BCM2835 on the Pi as well as the (optional) asoundrc that tells ALSA to set the default audio devices.
Note that the Raspberry Pi’s device tree by default may decide to include or not include the HDMI audio output before the Headphone jack (likely depending on if HDMI is plugged in, but other factors such as resolution may also affect it), so if you have HDMI plugged in, you can change
device 0todevice 1to use the Headphone output as the default audio output.
See the linked docs for more info about ALSA config files.
Post Image Script
The next script to edit is post-image.sh, which is run after the SD card images have been created by Buildroot. We can use this hook to edit the config.txt file that the Raspberry Pi
uses to pass parameters to the device tree. (More on device trees in the next article.)
In this file we need to explicitly tell the device tree to enable audio support. Unlike the previous scripts, we are appending
info, because the default post-image.sh script for the Pi already creates a default config.txt.export
echo "Adding options to config.txt to enable audio support"
cat << __EOF__ >> "${BINARIES_DIR}/rpi-firmware/config.txt"
dtparam=audio=on
__EOF__
Initial Build
Now it’s time to actually build the images and cross compile toolchain! Get ready to go make lunch or something, since this build will probably take at least an hour.
makeIf you run into any errors, especially in subsequent builds, you may need to consider running
make clean all, which performs a full rebuild. Since the build is so long, this can be a little painful… see Buildroot’s rules of thumb for guidelines on when ths might be necessary. But be careful when cleaning!! Your .config may be removed; save it to a safe location just in case.
Once the build completes, you will have all the products in the output dir of the repo. This contains, among other things, the
images to flash onto the SD card for the board as well as a cross-compile toolchain that we can use to build our own applications to put on the board.
For more info on what to expect in the output dir, see the section in the Buildroot docs.
Cross Compile ALSA Toy
Now you can use the cross compiler generated by Buildroot by adding it to the PATH and passing the compiler prefixes to
the alsa-sweep Makefile. See more in the first article for info on this program – in short, it outputs some siren-y bloops
using the ALSA API. The prefix for the Buildroot generated cross compiler depends on the package. In this case it is
aarch64-linux-.
# Run this from the Buildroot repo to add the cross compiler to your PATH
export PATH=$(pwd)/output/host/usr/bin:$PATH

# Go somewhere where you want to clone the alsa-sweep repo
cd ~ # optional, navigate wherever you like

# Clone it here and navigate into it
git clone https://github.com/jcampbellcodes/alsa-sweep.git
cd alsa-sweep

# Run the makefile using the cross compiler prefixes
CC=aarch64-linux-gcc CXX=aarch64-linux-g++ make

file booper # should indicate an aarch64 executable
Deploy Program Using Root Filesystem Overlay
Now that we have our cross-compiled program on hand, we need to tell Buildroot to include it in the image that we will deploy
to the Pi. This can be done using our root filesystem overlay; we will create a structure of folders and files that we want to be copied over the root filesystem by Buildroot. One logical place to put this is under the Raspberry Pi directory; if we wanted
our program to show up under /usr/bin on the board, we could set up the overlay like this:
mkdir -p board/raspberrypi4-64/rootfs_overlay/usr/binFrom there, we can copy in the output of our alsa-sweep build from the last section:
cp <path_to_alsa_sweep>/booper board/raspberrypi4-64/rootfs_overlay/usr/bin/booperNow we need to tell Buildroot to look under board/raspberrypi4-64/rootfs_overlay for the directory structure that we
want to copy to the target by setting the option in menuconfig:
make menuconfigIn menuconfig, navigate to System Configuration -> Root filesystem overlay directories, and press y to
see a dialog where you can pass a path to the root of the root filesystem overlay. In this example, you’ll
set it to board/raspberrypi4-64/rootfs_overlay.
From here, you can run make again. And don’t worry, since this is just an addition to the root filesystem,
the build should be much quicker (a few seconds).
Run “booper” on startup
The last thing I want to mention before sending this image to the board is how you could run the booper program
as a “startup tone” that runs once whenever the Pi is powered on.
You can use this inittab syntax as an addition to the post-build.sh script we modified earlier, which tells the
init program that /usr/bin/booper should be run once, asynchronously, as part of the boot process.
board/raspberrypi/post-build.sh
cat << __EOF__ >> ${TARGET_DIR}/etc/inittab
::once:/usr/bin/booper
__EOF__
Put the Image On Your Board
Now you need to flash your self contained Linux system on an SD card that you’ll insert into the Pi! There are commands
for flashing SD cards on the command line (such as dd), however they are a little annoying and can be risky. They don’t
show progress bars (and can run for hours sometimes), it’s easy to accidentally format your hard drive, and they might accidentally write corrupted images.
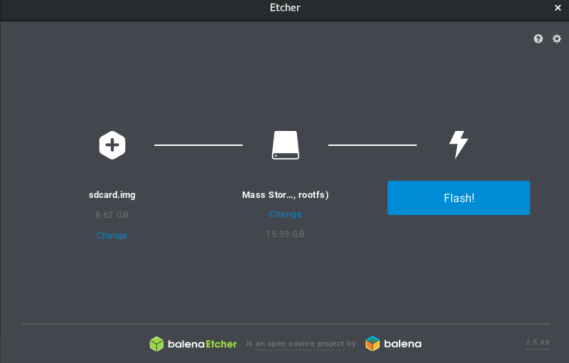
For this reason, I recommend using the Balena Etcher program instead. (It’s the program that BeagleBoard.org recommends for flashing SD card in their docs, so it has cred!)
Once downloaded, plug in your SD card. The image for the card should be output to the output/images/sdcard.img file by default
thanks to the genimage scripts in the Raspberry Pi board support package.
Now that the SD card is ready to be inserted into the Pi, there is one last part to figure out…
How To Connect To the Board
Unless you enabled SSH / networking in the Buildroot config, you’ll have to connect via UART to be able to talk to your Pi with a console!
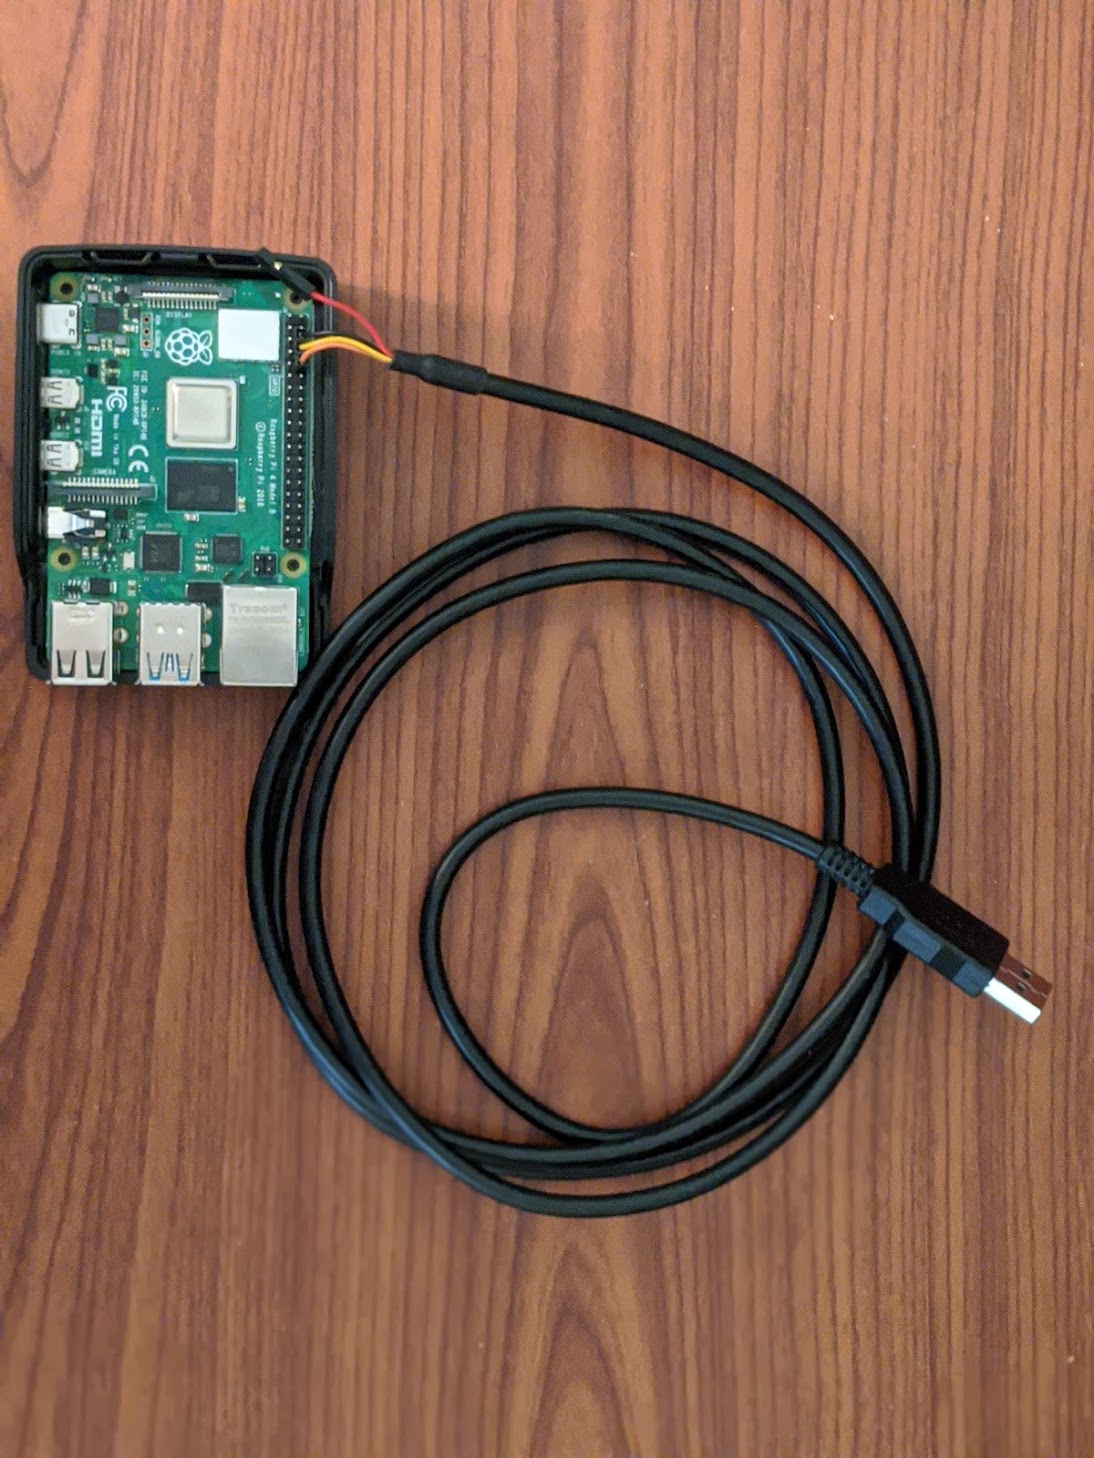
You’ll need a serial cable like the one pictured in the Materials section of this article, and you connect it like so, without powering on the Pi yet:
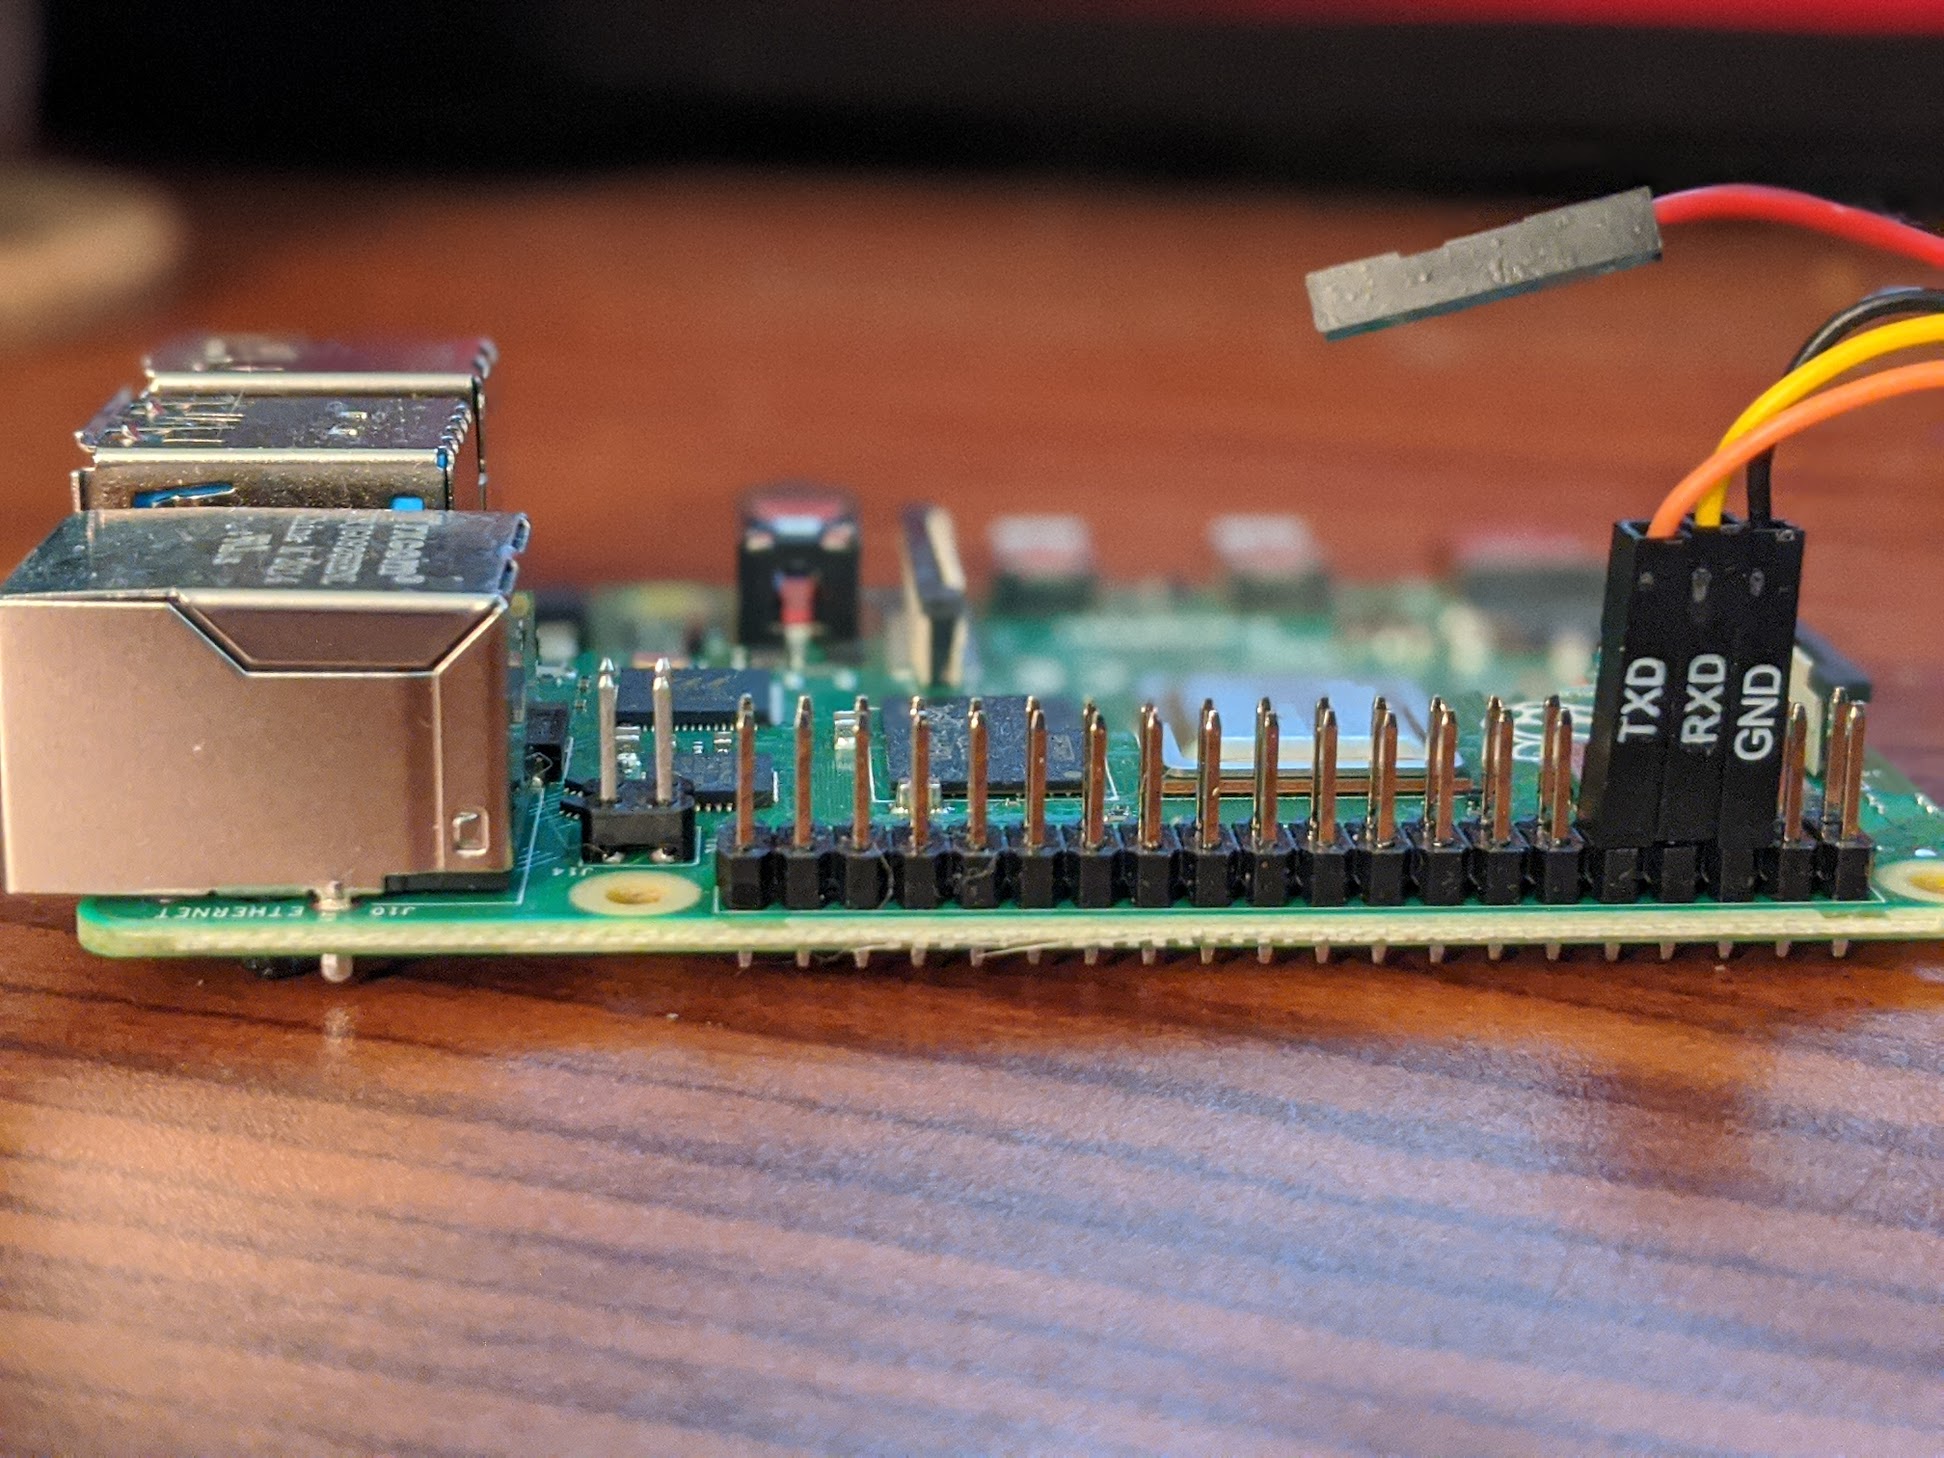
To help explain those connections, here is the official pinout of the Pi:
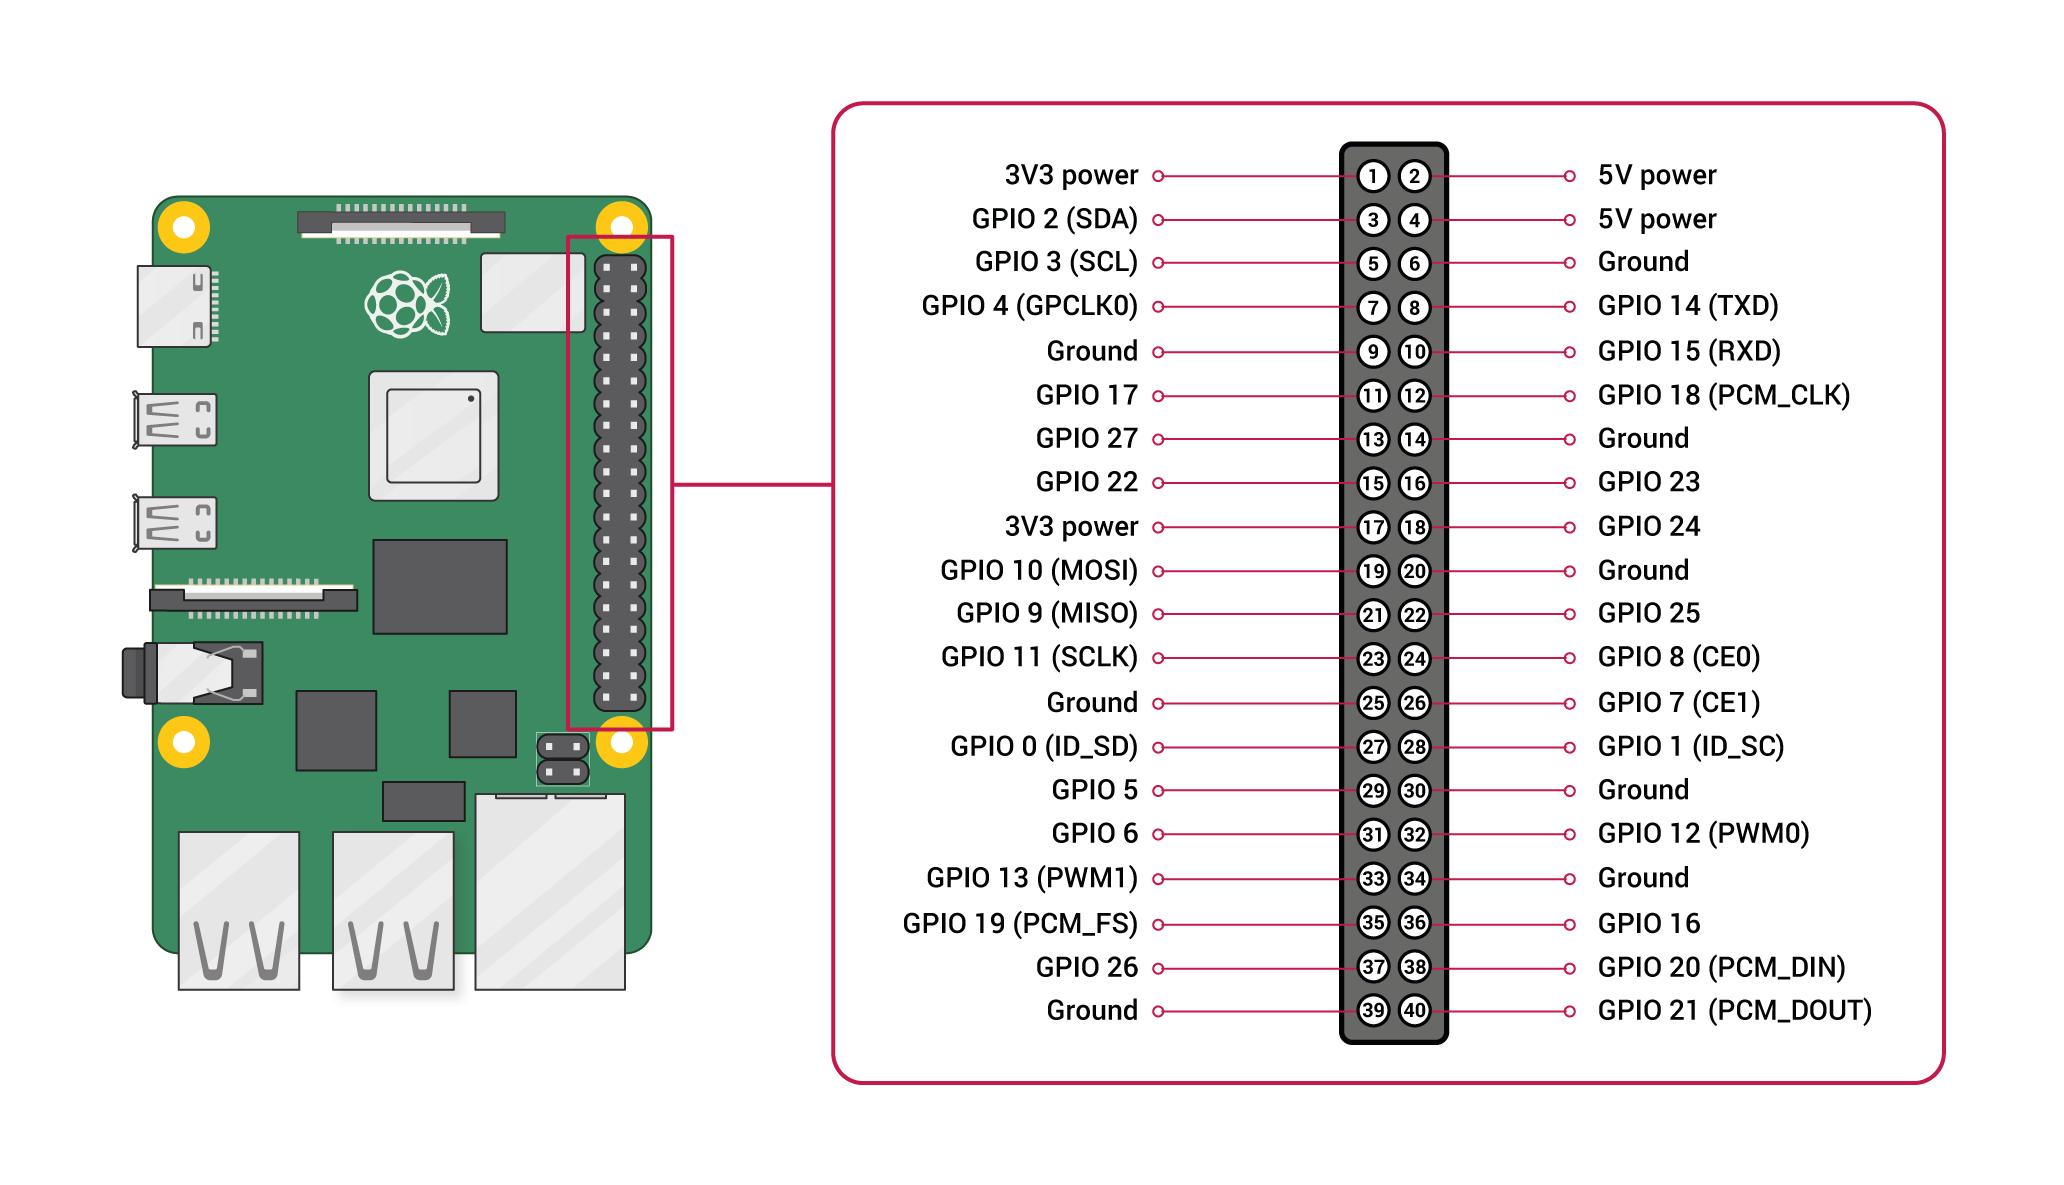
You need to connect the Tx (transmit) wire to the Pi’s Rx (receive) GPIO pin, the Rx wire to the Pi’s Tx GPIO pin, and the ground wire to the Pi’s ground pin.
Next, you need to run a program on your host to be able to talk UART. On macOS, these steps worked for me:
- On your host, run
ls /dev/tty*. This will list all of the available tty devices available to your Mac. - Connect the USB end of the cable to your host.
- Run
ls /dev/tty*again and compare this output to the last output; hopefully a new device popped up, something like/dev/tty.usbserial-AB0JTTYI - Knowing that device, and assuming a baud rate of 115200, run the
screenprogram like so:
sudo screen /dev/tty.usbserial-AB0JTTYI 115200Run the bloops
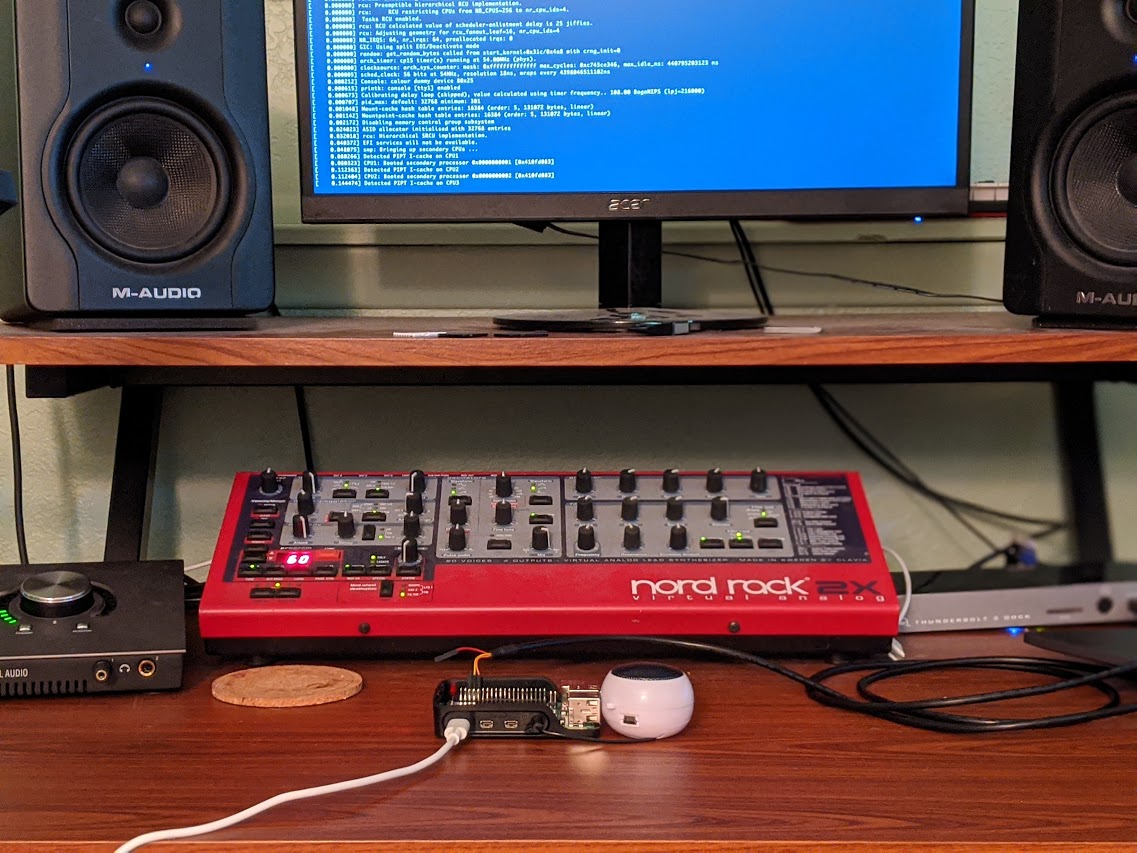
Now you should be ready to insert the SD card and power up the Pi! Here are the steps:
- Connect either headphones/some other 3.5mm audio cable to the Pi, or HDMI to an audio-enabled monitor
- Insert mini SD card
- Plug in the Pi to power
- Log into the Pi from your host. By default the credentials are
root, with no password.
If you enabled booper to be played on boot, you should hear it booping! Otherwise, you can run the program by hand
after logging in:
booperAnd that’s it! A lot of info piled into this article, but that’s why I wanted to write it. Once you go through this process a few times and get familiar with it, you will be well on your way to developing your own embedded audio applications for custom Linux systems. In the next article I’ll be going back to the Beaglebone and talking about device trees, communication protocols, and how outputting audio over I2S works in embedded systems.
Acknowledgements
Thanks Archie3D from TheAudioProgrammer Discord for the tips on enabling the BCM2835 audio kernel module with the BusyBox init scripts as well as a simple ALSA config file.