DEVELOPING AUDIO PROGRAMS FOR EMBEDDED LINUX, PART 1
For some time, I have wanted to upgrade my very limited embedded systems chops and start making things bleep and boop. I’ve had a Beaglebone Black lying around for awhile and wanted to use it to explore:
- How to write ALSA audio programs (a Linux audio API)
- How to cross-compile them for an embedded platform
- How to connect an external DAC to get some audio out without a full-blown USB audio interface or HDMI monitor
I had trouble finding articles that spelled this stuff out for a beginner embedded systems programmer, so now that I got it up and running, here’s what worked for me! If I were to guesstimate an “intended reader” for this article, it would be a programmer comfortable with C-like languages and digital audio technology looking to apply those skills in the embedded world.
This post, part 1, is all about the software itself and how to cross-compile/deploy it to your board. This part has a lot of “Note” moments because there are plenty of caveats and alternative ways to do this stuff. But strictly speaking, this approach is proven to work for at least one person and didn’t fry anything!
A following post will detail how to set up the circuit, enable peripherals in embedded Linux using device tree overlays, and explain how I2S audio output on the Beaglebone works – originally that was going to be part of this post, but it turns out that stuff is quite the deep dive!
UPDATE 12-5-2020: For longer term projects, using an embedded build system like Yocto or Buildroot is way easier to maintain than ad-hoc cross compilation using something like Debian multiarch. See the next post on board bringup for more info on that approach – though this article still has some important background information about cross compilation in general.
Materials
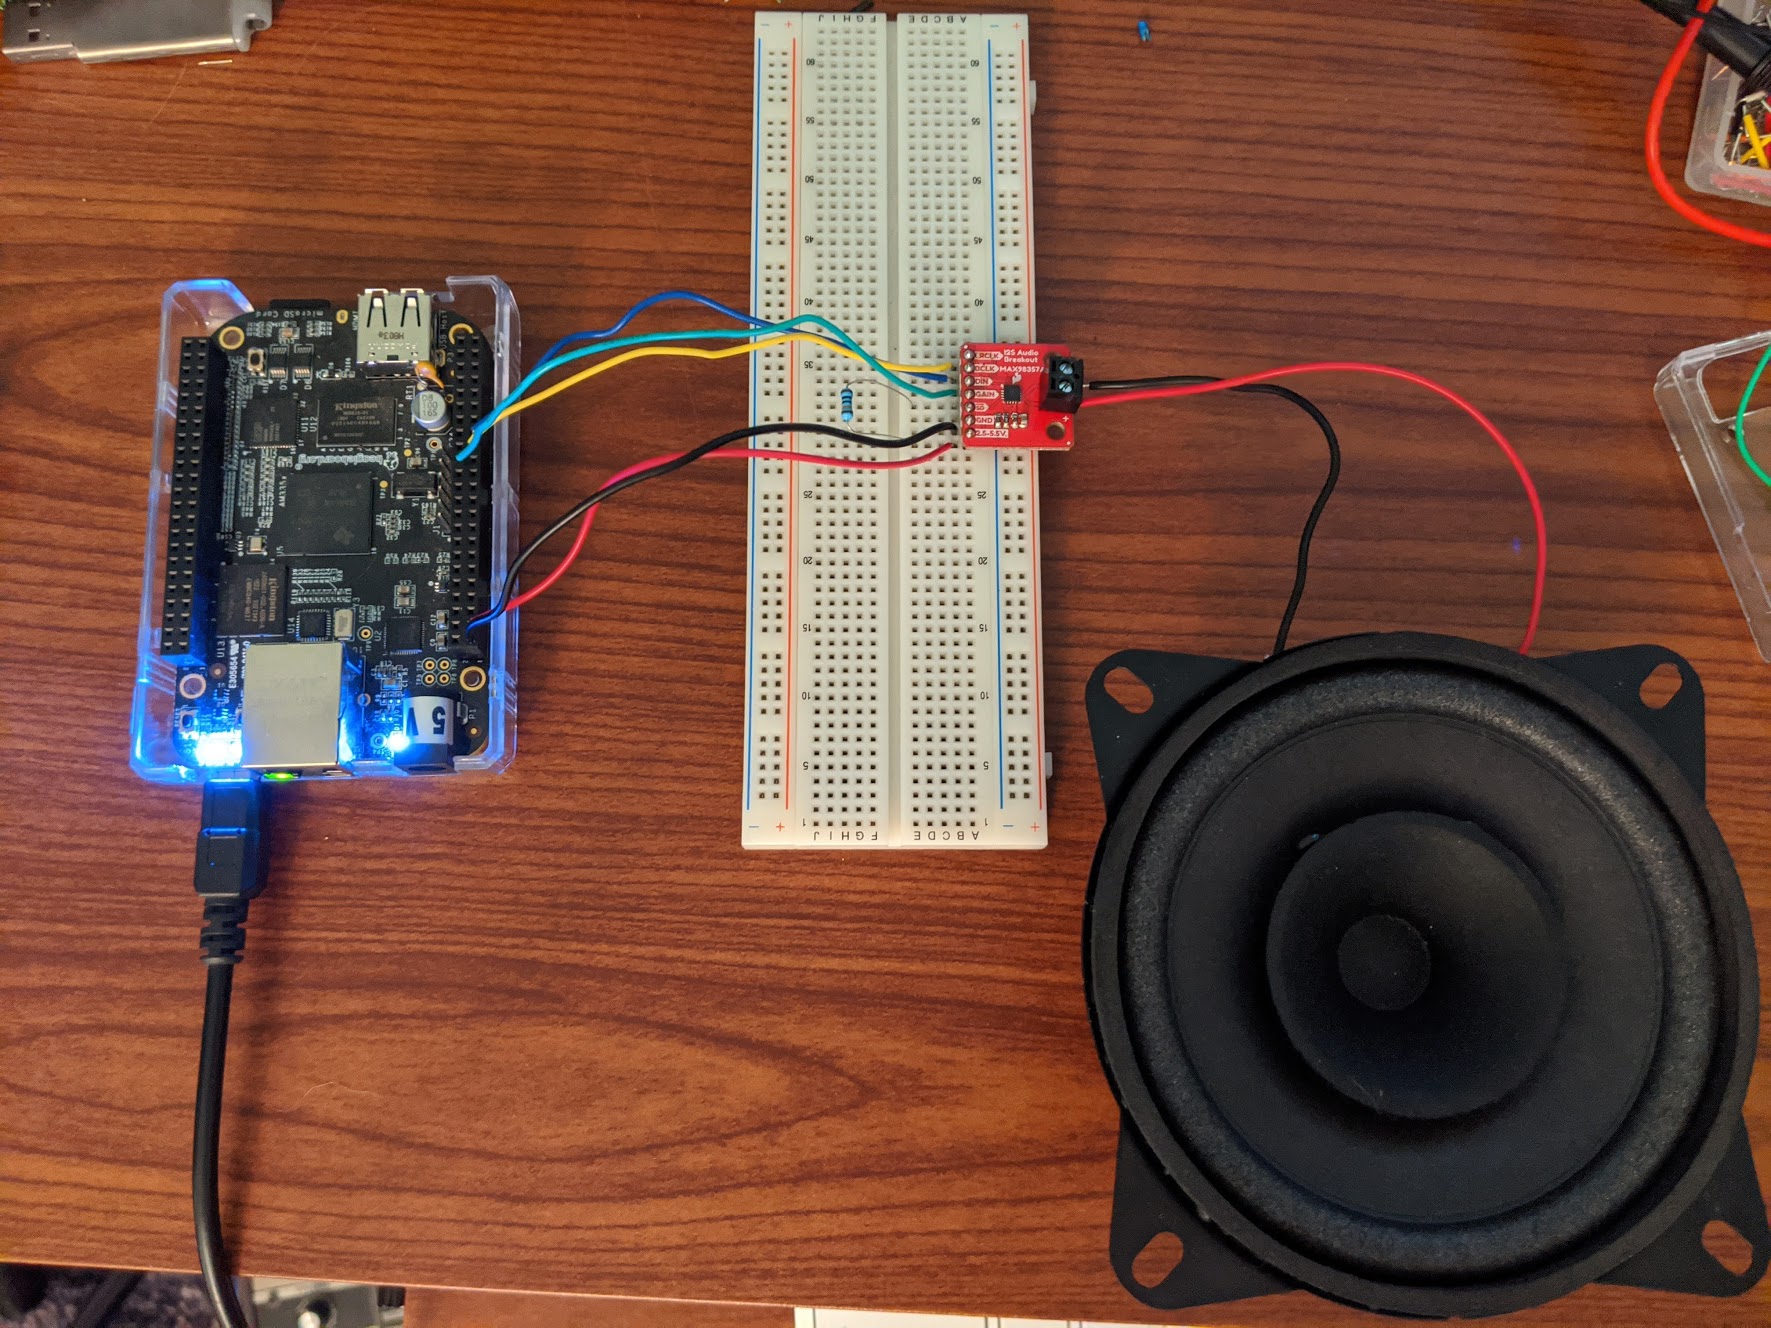
- Beaglebone Black
- I2S DAC and audio amplifier. This one from Sparkfun is cheap and works great!
- Speaker (I got a 4” 8ohm speaker)
- Jumper wires and breadboard
- Host computer running Debian Stretch (I used VMWare on macOS, but a native Linux box would have been preferable :) )
Initial Host Setup
What is cross-compiling and why am I suggesting we do it?
In order to develop an ALSA program on a desktop computer (the “host”) and have it run on an embedded device like the Beaglebone (the “target”),
we need to set up a “cross compilation” environment, allowing you to compile your programs on your powerful host that can run on your target.
Note that cross compilation isn’t strictly necessary to develop applications for embedded Linux - another option is to “compile on target”,
which means you connect to your embedded device over SSH and use gcc on the board to compile it there directly. This is, in general,
leagues simpler than cross-compilation, but for larger codebases the process may be time-prohibitive (one time my poor Beaglebone spent 20+
hours compiling OpenSSL and curl) or there might simply not be enough memory on the device, causing gcc to error out. That’s definitely not the case with the
toy program in this article, but I wanted to describe how to cross compile anyhow so you can apply this process to
work with larger audio applications. It may help to learn more about cross compiling here.
Pick a host Linux distro
Before anything, you need to decide which type of host setup is best for your cross-compilation scenario.
As it turns out, this decision is not particularly straightforward. One thing that is standard at least is that
one will have an easier time using a Linux host – macOS and Windows are possible as well, but when cross-compiling
for embedded Linux (as opposed to a “bare metal” embedded system), using a non-Linux host further muddies an
already complicated process. (Though on Windows, VisualGDB for Visual Studio seems like a promising cross compilation solution!)
From there, if you have chosen to use Linux, you need to choose a Linux distro suitable for cross-compilation.
When it comes to cross compilation, not all distros are built equal– historically, Debian was considered
Not Great for cross compilation. However, since Debian Stretch (9.x), multi-arch
support has made it a much more viable option, allowing you to install ARM system libraries/headers/compiler/linker
(a “cross toolchain”) for cross compiling without messing up your native system
libraries in /usr/local/lib etc.
One other consideration to take into account is which distro you have on the target system, because obtaining a pre-built cross toolchain for an older compiler can be a pain. Embedded build systems like Yocto and Buildroot and/or Docker containers can make this aspect more manageable (and are much more necessary for doing this sort of thing at scale), but for me it worked to specifically use Debian Stretch, since that was installed on my Beaglebone as well. In fact, for longer term projects, using an embedded build system is way easier to maintain than ad-hoc crosscompilation using something like Debian multiarch. See the next post on board bringup for more info.
As an aside, originally I was using Debian Buster (10) and couldn’t find a clean way to get multi-arch support for armhf with the specific version of gcc I needed (6.3.0), and so my program failed at runtime on the board. I’m sure it’s possible to make it work with a different distro on the host (see later in the post about the TI SDK), but for now, my approach is just to use the same Linux distro on the host as the board has if possible so you can rely on unaltered apt-get commands.
So: assuming you have Debian Stretch on your Beaglebone, go get an amd64 image of Debian Stretch and install it either in a virtual machine or natively if you are so inclined.
Each distro has it’s quirks, and with Debian Stretch specifically I find in most cases the initial setup I need to
do after the “Wizard” in order to do anything useful is to set up my user to be able to do sudo
and sudo apt-get install git to get git, which are also two things you’ll need to do to follow this tutorial.
Make an ALSA Toy
Now that you are set up with a host environment, let’s talk about writing a simple ALSA program that we can compile on it.
At first, we will just compile this on the host, for the host, pretending the target doesn’t exist. This gives us confidence
that the program is actually working and producing some bloops. Check out the toy ALSA program here.
You can clone and build the project like so from the command line:
cd ~ # optional, navigate wherever you like

git clone https://github.com/jcampbellcodes/alsa-sweep.git

cd alsa-sweep

make

./booper # run the output program, named booper
This project uses make, but the following guidelines will apply to CMake and other build systems as well.
Since CMake/make are used by many IDEs, you should also be able to extrapolate these guidelines to getting set up
with an IDE to do this stuff. The main point is that none of your build scripts should assume a compiler. Use variables
like ${CC} for C compiler commands and ${CXX} for C++ so that you can use the same build scripts to work with your host
compile toolchain as well as your cross-compiler, which instead of g++ will be something like arm-linux-gnueabihf-g++.
What does the program do?
The goal of this program in this article is just to write enough ALSA code to do something mildly amusing with audio so we have something
to compile for our device. I chose ALSA over other Linux audio APIs because it is a prevalent and low-level API that will
be easy to use as an example for cross-compiling with Debian multi-arch, since you will need to install the armhf version
when we get to cross compilation without disturbing your native ALSA libs. From here you can go read more about ALSA
or other APIs to write programs that are closer to things you actually want to make.
But in short, here is breakdown of the script:
Opens the default sound device (check out which sound devices you have available by running aplay -L from the
command line; default or plughw:USB,0 are fairly standard) and get a handle to it:
snd_pcm_open(&handle, gDevice, SND_PCM_STREAM_PLAYBACK, 0)Sets the hardware and software parameters for the device:
snd_pcm_set_params( handle,
                    SND_PCM_FORMAT_FLOAT, // this determines the data type of the audio calculation below
                    SND_PCM_ACCESS_RW_INTERLEAVED,
                    gNumChans,
                    gSampleRate,
                    1, // allow resampling
                    500000)
Generates some audio into float buffer [gBufferLen]; (a triangle wave that slides up and down, because why not)
Writes that buffer to the device using the handle:
snd_pcm_writei(handle, buffer, gBufferLen);And closes the device at the end:
snd_pcm_close(handle);ALSA is a good API to know if you are going to be working on audio in Linux, however there are higher level APIs such as JACK you should consider that can make your life easier for making actual products.
There is a succint but useful writeup by the creator of JACK on how to get started with simple ALSA applications, as well as this article. You also may find useful the Linux Kernel guide for writing an ALSA driver.
If you got through this and your computer did some sounds, then you are ready to move on to compiling the program for your embedded board!
Cross Compilation
So far when building this program using the makefile, you have just been using the host compiler g++ to build the program
to run on the host machine. As threatened above, to compile for your ARM target device (Beaglebone), you will need to switch out
g++ with a compiler for ARMv7l Hard-Float, arm-linux-gnueabihf-g++. In reality, you will need more than just the compiler – your compiler will
also need the corresponding ARM-specific headers, libraries, linker, and even debugger. All these components make up the “cross-compile toolchain”.
Luckily, Debian’s multiarch support allows you to install all the tools you need in a cohesive way with only a few commands.
Which toolchain do I need?
Before you can set up the toolchain on your host, you need to determine the architecture of your embedded device so you can get the right tools. The same cross toolchain won’t work, for example, for ARMv7l (armhf, armv7l) and ARMv8 (arm64, aarch64) devices. You can find out the architecture by logging on to your device and running:
:~$ dpkg --print-architecture
armhf
This can change depending on your OS support, and the nomenclature starts to get confusing and historical. For example, the Raspberry Pi 4 is a
64-bit device, but at the time of writing, the official Raspbian OS only supports 32-bit architectures, so you’ll still see armv7l when
checking the architecture; however, other community OSes on the Rpi4 support aarch64, a 64-bit ARM architecture. On the Beaglebone Black, you’ll
see armhf, which is still 32-bit ARMv7l, but includes the hardware floating-point (hard-float, or hf) support.
That’s a long-winded way to say it’s worth spending the extra time to find exactly which architecture your board supports and choosing the correct toolchain before diving in.
Install the toolchain
Once you determine the relevant ARM architecture of your target, you need to get the relevant toolchain. For Beaglebone Black, as stated earlier,
this architecture is armhf. On Debian, you can install multi arch support like so:
sudo dpkg --add-architecture armhf
sudo apt update
sudo apt install crossbuild-essential-armhf
Note, if you want analysis paralysis, you can also get cross toolchains from specific vendors, which may make things easier especially if you are using a different host Linux distro than that of the target. For example, the Beaglebone uses a TI AM335X processor, so you can grab their SDK here, which includes a cross toolchain. That’s another totally viable (and maybe more industry standard?) approach but this article is going to forge on with the Debian multiarch approach.
Now you have a cross compiler installed. Remember the prefix arm-linux-gnueabihf-, because it will now pop up often when using this toolchain in
various contexts (environment variables, command line options, system directories, etc).
Then whenever you want to apt-get a library to use for compilation, you can specify that you want to install the armhf version using multiarch
syntax :armhf:
sudo apt install <libname>:armhfFor this program, we need to install the armhf version of the ALSA libs:
sudo apt-get install libasound2-dev:armhfNote that not all
aptpackages have “multi-arch” support. For example, as of this writing, OpenSSL does not have this support and you may have to download the source and cross-build the library yourself. Each library may have its own quirks, so you may have to play around with supplying cross-compilers and other options to the various stages of the build. If you haven’t built a Linux-style lib before, read about the configure, make, make install paradigm, because you will likely need to inject your cross compiler into these different stages. This is one scenario where you would be using thearm-linux-gnueabihf-a lot to communicate that you are building this library for installation into your cross toolchain rather than your native system area.
But you don’t have to worry about this with ALSA specifically, so now you should be all set to cross compile this program!
Let’s cross compile
With your cross compiler in place, all you need to do to compile for the Beaglebone is specify the environment variables
to use that compiler with our make file.
First get back into the source dir, as a reminder:
cd ~ # optional, navigate wherever you like

git clone https://github.com/jcampbellcodes/alsa-sweep.git # if you haven't cloned it yet or didn't do the host compilation section above

cd alsa-sweep
This program only uses C++, but for completeness, here is how you specify both the C and C++ cross compilers when calling make
CC=arm-linux-gnueabihf-gcc CXX=arm-linux-gnueabihf-g++ make

./booper # this should fail on your host, because you can't run ARM executables on amd64!

file booper
Should see output about the file that says it is a 32-bit ARM executable:
booper: ELF 32-bit LSB shared object ARM, EABI5 version 1 (SYSV), dynamically linked, interpreter /lib/ld-, for GNU/Linux 3.2.0, BuildID[sha1]=3327c30466b814b5db2ff40f8b60444583c9afe6, not strippedWhat’s Next
The next article will go into how to set up the circuit, the process for figuring out which Beaglebone pins to hook up to, how to configure those pins, and how to get this program running.
Until I get that article going, if your Beaglebone is set up already, use scp to deploy your executable to the board:
scp booper debian@beaglebone.local:./Now go to you Beaglebone’s home directory and execute the file – it should make some noise! Thanks for reading and see you soon!